Showing posts with label 3-d. Show all posts

Tuesday, February 16, 2010

February Stamp Club

Back from vacation and back to stamping. And it's time for stamp club again!

This first card is a thank you card "note card" style. It gives you enough room to write a quick note to someone on just a card front. Easy way to create a bunch of thank you cards to have on hand! With a little 3-d flower in the corner by punch circles and then crinkling them up!


Recipe:
Stamp Set: Family Phrases
Paper: More Mustard, Old Olive, Welcome Neighbor DSP, Sweet Pea DSP
Ink: Melon Mambo
Accessories: Dimensionals, Earth Elements Brad (More Mustard),
Chocolate Chip Ribbon, 1 3/8" Circle Punch, 1 1/4" Circle Punch,
1" Circle punch, 1/2" Circle Punch

Now, punch art has been all over the place, and is SOOO fun to create little critters out of your punches! This super cute little sheep reminds me of spring and of Easter. He is sitting on a corner bookmark, which would make a great gift for a reader in your life!

Recipe:
Ink: Basic Black (for sponging)
Paper: Sweet Pea DSP, Whisper White, Basic Black
Accessories: 1 3/8" Circle Punch, Scallop Circle Punch, Trio Flowers Punch,
Word Window Punch, Large Oval Punch, 1/2" Circle Punch, booglie eyes

This last one is a great little 'welcome to the neighborhood' gift! Fill it with cookies, candies, or some other kind of snack mix for someone new to the neighborhood! I loved getting those kinds of gifts when we moved!

Recipe:
Stamp Set: Sweet Season
Ink: Old Olive
Paper: Melon Mambo, Crushed Curry, Whisper White, Welcome Neighbor DSP
Accessories: Gift Bag (from Hobby Lobby), Wide Oval Punch, Dimensionals, Silver Brad, 3 flower punch, Silver Cord, Crushed Curry Ribbon, Horizontal Slit Punch


See you tomorrow!

Wednesday, August 12, 2009

Stamp club

It's that time again! Stamp Club! Oh my it has gone fast, and my posts have been far and few between. Hopefully I will feel 'put together' enough to enjoy some down time soon! I had a few requests last month for techniques and/or products to use at this next stamp club, and I did my best to comply.

The first was how to use the Stamp-a-ma-jig. This is a great tool to use for those hard to position stamps. Also great to use if your sentiment is always crooked. Its super easy to use. You first ink your stamp and and stamp it onto the transfer sheet. Then use this sheet to position your stamp-a-ma-jig on the paper to place your image perfectly.

This little pocket is so perfect for a little note, a gift card, or whatever little treat you want to give someone. You know how I love those! The base is one of the medium standard SU! envelopes cut in half!

View of the inside envelopes:
Recipe:
Stamp Set: Trendy Trees, Teeny Tiny Wishes
Ink: Old Olive, Chocolate chip, So Saffron
Paper: Old Olive, Old Olive DSP, Naturals Ivory, So Saffron
Accessories: Dimensionals
Technique: Sponging

This next project incorporates 2 of the requests (sorta). Tearing is something that we hadn't done in awhile, and I put a little twist on tearing. Instead of tearing the cardstock, just scratch your fingernail along the edge to give it that 'rough' look. I kinda like it better than tearing. This card also uses the Circle Scissor Plus. Now, this is a great tool to make any size circle you desire!
Now the trick to using this tool is to use just a dab of adhesive to make sure your paper sticks to the glass base. As long as you secure the paper, you should have no problem cutting a perfect circle everytime!

Now, this card is a little out of my comfort zone, but we all need to try that once in awhile, right? It is very monochromatic, which is not something that I attempt very often. Now, my house is all very neutral, but my cards definitely aren't. :)


Recipe:
Stamp Set: Winter Post
Ink: Soft Suede
Paper: Kraft, Chocolate chip, Naturals Ivory, Kraft DSP
Accessories: Dimensionals
Techniques: Sponging, Rough tearing, Circle Scissor Plus

The last project is super fun! A purse! The base is your typical lunch sack. I'm sure you have a few of those hanging around your kitchen that you would love to turn into a beautiful little project, right? Its pretty easy to accomplish, and turns out oh so cute!
Here is the side view. You can see the lunch sack:

Recipe:
Stamp Set:
Family Phrases
Ink: Garden Green
Paper: Garden Green, Very Vanilla, Tempting Turquoise, Flock Together DSP
Accessories: Oval Punch, Oval Scallop Punch, Fillagree brads, dimensionals, So Saffron Ribbon, Lunch sack

See ya tonight!

Monday, May 25, 2009

LOVE the Top Note!

Oh my! I may be completely addicted to making these cute little bags. I had seen them awhile back, and hadn't gotten around to buying the paper sacks until yesterday. I just LOVE how they turned out, and you could totally use them for any occasion. As a little thank you gift, favors for a party, place markers at a table, the ideas are endless! Be looking for me to make more of these down the road. A fantastic way to show off the designer paper too!!!

The sentiment on this one "too cute" is perfect for this little tote! And the polka-dots make me smile!

Recipe:
Stamp Set: Sweet Celebrations
Ink: Baja Breeze
Paper: Urban Oasis DSP, Kiwi Kiss, Going Gray, Whisper White
Accessories: Big Shot Top Note Die, Word Window Punch, Scallop Circle Punch, 1 3/8" Circle Punch, 1 1/4" Circle Punch, Dimensionals, Baja Breeze Ribbon

This second one I used my new Cute and Curly Bundle, which is AWESOME! You get 4 stamps that go along with this adorable punch! To get the Chocolate layer, I just adhered the punched out sentiment to the Chocolate and cut around it!

Here is a side view of the bag - you can see the paper bag inside that I am using as my base. I got them at Michael (in the wrapping paper section). They are 3 1/2" x 2" x 6 3/4" and I cut off the top of the bag, measuring from the bottom at 2 3/4".


Recipe:
Stamp Set: Cute and Curly
Ink: Chocolate Chip
Paper: Sweet Always DSP, Chocolate Chip, Whisper White
Accessories: Big Shot Top Note Die, Word Window Punch, Chocolate Chip Ribbon, Dimensionals, Curly Punch

I hope you like these! I hope to spend a bunch of time creating today and this week - I have been a slacker lately! Too much going on! Hope everyone has a great Memorial Day - thanks for stopping by!

Friday, March 13, 2009

Stationary Box

Who doesn't love a great gift idea to a friend? This will be a gift for a good friend (it is a VERY late gift....her birthday was in January). The box contains 8 cards, and I used 2 different color cominbations for the cards.

I am attempting to use up some of my designer paper so that I don't feel guilty about opening a new package. I just love the Candy Lane Designer Paper, although most of it looks very "Valentine-y". Some of the prints are mono-chromatic and make for a very elegant card. I also used 3 of the different Sale-A-Bration stamps. I skipped the sentiment so she can use them for whatever occasion she needs them for!


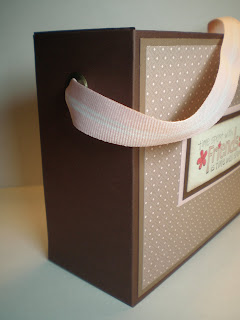
This is the stationary box that I made them to go inside of. To make the box: You will need 2 pieces of cardstock that measure 11x7.5. Score them at 2.5" on each side, and cut the 2.5" score line to form the bottom of the box. Make sure you use Sticky Strip to put the box together so it stays!!


Here is a side view of the box. You can see that I used the Jumbo Eyelets to make the handle with the Pink Pirouette ribbon, knotted on the inside of the box.

Recipe:
Stamp Set: Polka Dot Punches, Time Well Spent (retired)
Ink: Close to Cocoa, Chocolate Chip, Pink Pirouette, Riding Hood Red
Cardstock: Riding Hood Red, Pink Pirouettte, Chocolate Chip, Close to Cocoa, Very Vanilla
Accessories: Chocolate Chip Felt Alpine Ribbon (retired), Candy Lane Designer Paper, Metallic Eyelet, Dimensionals, Scallop Circle Punch, 5 Flower Punch, Silver Brad, Flower Fusion, Jumbo Pewter Eyelet, Pink Pirouette Ribbon
Technique: Sponging

Hope you enjoyed my little stationary box! It was so fun and easy to make, and I think she will just love her gift!

Wednesday, January 28, 2009

Yummy Treats!

It is almost that time of year again - Yep - Sale-A-Bration! If you are new to Stampin' Up! or want the details on what Sale-A-Bration is, please contact me! The skinny is that for every $50 you spend, you can choose a free stamp set, package of designer paper or ribbon duo! You can download the flier by clicking on it below, or contact me and I will get you your very own Sale-A-Bration catalog! The sale begins February 1.

Now onto the yummies! Splitcoast Stampers does a weekly e-mail that you can participate in, and when I got this week's email I just knew I had to participate. Who doesn't love a little treat holder, especially when it is Ghirardelli chocolates! You can find the tutorial here to make your very own!

This first treat holder I made with the new Good Morning Sunshine Paper which is so fun and bright! I also used the Yummy stamp set from the Sale-A-Bration catalog which you can get free starting Sunday with a $50 order!


The second box I made using the Designer paper from the Sale-A-Bration mini, Delicate Dots Designer Paper, and another sentiment from the Yummy stamp set!

I think these little treat holders are super cute, and the sentiments are just perfect. If you love making home made treats and giving them away, this is the perfect set for you!

Hope you enjoyed. Stay tuned for more using the great Sale-A-Bration items!

Recipe for first box:
Stamp Set:
Yummy
Cardstock: Pacific Point, Kiwi Kiss, Whisper White
Accessories: Scallop Edge Punch, Dimensionals, Sticky Strip, Good Morning Sunshine DSP

Recipe for second box:
Stamp Set:
Yummy
Cardstock: So Saffron, Bashful Blue, Whipser White
Accessories: Scallop Edge Punch, Dimensionals, Sticky Strip, Delicate Dots DSP

Friday, January 23, 2009

Valentine Candy Bag

Alright, we are back to Valentine's Day. This is a cute little treat holder that would be easy to duplicate for the girls at the office, or friends or family, or for the kids at school.

You still have until January 31st to order the Love you Much Bundle at the 20% off. Contact me today if you want to order it!

When I bought the Valentine's candy at Target, the gal at the check-out says "You are buying Valentine's candy? I haven't even taken my Christmas Tree down yet!" Yikes! I would say she needs to get going!

The base of the treat bag topper is Pink Pirouette and folded in half. The front of the card is punched with the Scallop Edge Punch. Next to the Heart to Heart punch, this is my second favorite new punch!

The Love you Much sentiment is stamped on Kraft and layered on top of a piece of Chocolate Chip. The corners are rounded on the top with the Corner Rounder Punch. I colored the LOVE in with Riding Hood Red and the leaf in with Garden Green. I used the Heart to Heart Punch for the little Pink Pirouette heart in the middle of the O.

A small Silver Brad is the center of the flower. In amongst all the carmel filled Hershey kisses is some shredded paper that I ran through the crimper.

Hope you like my little treat bag!

Recipe:
Stamp Set: Love You Much
Ink: Riding Hood Red, Chocolate Chip, Garden Green
Cardstock: Pink Pirouette, Chocolate Chip, Kraft
Accessories: Heart to Heart Punch, Dimensionals, Silver Brad, Medim cello bag

Wednesday, January 14, 2009

Love you Much Candle

When I saw this technique, I thought it was the coolest EVER, and ran right out to Target to get a candle so I could come home and try it!


So - this is what you do. Take a small piece of tissue paper -- I used some from my gift wrap box -- make sure it is white. Stamp your image onto the tissue paper, either by using your stamp pad or with your markers. Then use your scissors and cut around the stamped image as close to the image as you possibly can. Next you are going to rip off a piece of wax paper, enough so that it wraps around the entire candle, and also leaves you a little room on the back for a 'handle'.

Line up your inked piece of tissue paper onto the candle, making sure that your inked image is facing UP! Then, wrap it in your piece of wax paper. Next you will take your heat gun and heat the image, just like you are embossing. You will notice that the image will take on the same 'glazed' effect that it does when you use the embossing powder. The tissue paper and inked image will essentially melt into the candle. Remove the wax paper, and now you have a beautiful stamped image on your candle!

I think I am going to try this with some different images, or possibly this image with alternate colors. Stay tuned! This one went as my gift to my hostess for Stamp Club!

Recipe:

Ink: Riding Hood Red

Technique: Embossing

Thanks for stopping by!

January Stamp Club

Well, the first club of the new year is tonight. That also means that it is the last club of the Fall/Winter Catalog! Kinda sad to see some of those items going, but oh so exciting to be introduced to all the new and wonderful items in the new one! I received my catalog last night and I just can't wait to place my first order! There really are some amazing things in there, and I can't wait to share some of them with you!

Onto club. We are making three Valentine's related items, and all of them are made using the Love you Much Bundle, of course!

The first card you have already seen, as it was on one of my earlier posts earlier in the week here. I just loved all the punched out hearts!

The second card is more of a candy holder, but the candy could be omitted and be used just as a card as well. Inside this card is a Ghirardelli chocolate square and it is pink for Valentine's!

The base of this card is Pink Pirouette and I used the Scallop Edge Punch on the front flap. The little love birds are just so adorable! I first stamped them on Very Vanilla and then stamped them on the Candy Lane Designer Paper and cut them out so they were fancy love birds! A little (non-SU!) heart brad is above their head, and are wrapped up with Riding Hood Red Ribbon.

The last card isn't really a card at all, but also a candy holder. Sorry, I couldn't resist with Valentine's coming up to not do more than one candy holder! This one is made using the diaper fold, which is super easy and makes a cute little pocket.

To do the diaper fold, take your designer double sided paper and cut into a square. In this case, I did a 6x6 square. Fold er in half so it is a triangle, and with the point facing up, fold the sides of the triangle across to the other side. Fold down the top flap, and there ya have it!

I used the Candy Lane Designer Paper, and secured it with Sticky Strip. The heart on the front is cut out with scissors and is from the Love you Much stamp set. It is colored in using Riding Hood Red, Pink Pirouette and Close to Cocoa. Now, I know we don't have markers for the In-Colors, but if you take a little ink from your re-inker and drop it into the lid of the stamp pad, you can use your Blender Pen to act like a marker! Neat trick, huh? The Sentiment is also from Love you Much and is stamped in Chocolate Chip, punched out with the Word Window and secured with a Silver Brad. The M&M's are in the Small Cello Bag and tied up with the Pink Pirouette Ribbon!

Here is a picture of all three club projects! I hope you like them as much as I do - are you falling in love with the Love you Much set yet?

Card Recipes:
Stamp Set: Love You Much
Ink: Pink Pirouette, Riding Hood Red, Close to Cocoa, Chocolate Chip
Cardstock: Riding Hood Red, Very Vanilla, Close to Cocoa, Pink Pirouette
Accessories: Dimensionals, Silver Brad, Word Windo Punch, Small Cello Bag, Pink Pirouette Ribbon, Corner Rounder Punch, Chocolate Chip Ribbon, Scallop Edge Punch, Riding Hood Red Ribbon, Glue Dot, Sticky Strip

Thanks for stopping by!
T

Tuesday, January 13, 2009

Valentine Pizza Box

I saw the pattern for this little pizza box with mini-valentines inside it, I just knew I had to do it! The picture seems decevingly large, but it is small and really easy to make. What a great little Valentine gift it would be for someone. And who doesn't love pizza?

This is a picture of the oustide of the box. Let me know if you need dimensions, and I would be happy to e-mail them to you! I just know you want to try out the pizza box!

The box is made from Riding Hood Red Cardstock and I used Sticky Strip to keep it together. The regular Snail adhesive doesn't seem to stil as well for these 3-d projects, and you want to make sure that your box doesnt' come apart! The patterned paper is the new Candy Lane Designer Paper that can be purchased in the upcoming catalog being released on January 19th! It can also be purchased in the Love you Much Bundle, and details on this bundle can be found on my post here. The Hugs and Kisses is from the Love You Much stamp set and punched out with the 1 1/4" punch. It has a 1 3/8" punch in Close to Cocoa behind it, and then a Riding Hood Red Scallop Circle Punch. The scallop is pierced with my Paper Piercer. This is all up on blocks, of course (dimensionals). A piece of Choclate Chip Ribbon runs across the top of the box. The hearts that run across the bottom are stamped, and then punched out using the 3 heart punch from the Love You Much Bundle.

Here is a shot of the box opened:


And now onto the cards. I put 4 3x3 mini cards inside which make the perfect little love note! You could probably put envelopes in there as well, although I didn't think about that until just now....

There are 4 cards in the box, 2 of each design. The card measures 3x3. The patterned paper is again the Candy Lane Designer Paper. The bases are Pink Pirouette and Close to Cocoa. The little love birds (don't you just love them ♥) are from the Love you Much set and stamped on Very Vanilla and punched out using the 1 3/8" Circle Punch. The Scallop Circle Punch was used on Pink Pirouette and Riding Hood Red and then pierced and up on blocks. The bottom of the designer paper was punched with the Scallop Edge Punch (if you don't have this punch yet - it is a must have! Makes things so easy and elegant). Some Chocolate Chip Ribbon runs underneath the medallion. The heart above
the love birds is stamped using the Love you Much set and then punched out using the heart punch from the same set. I think the 4 of these cards in this little box just are so darling! And I just LOVE the Candy Lane Designer Paper!! Who doesn't love pink and brown together??!!

Card Recipe:
Stamp: Love you Much
Ink: Close to Cocoa
Cardstock: Riding Hood Red, Pink Pirouette, Very Vanilla, Close to Cocoa
Accessories: Scallop Edge Punch, Chocolate Chip Ribbon, Dimensionals, 1 3/8" Circle Punch, Scallop Circle Punch, Paper Piercer, Candy Lane DSP


Thanks for stopping by! I hope you are loving this new bundle as much as I am! More to come!

T

Friday, January 9, 2009

Tile Coasters

So every year for Christmas I make my family and Duane's family something "home-made". Some years this list has grown to include friends and co-workers, depending on the scope of the project. This year I decided I wanted to do something with stamping, and since I waited until the last minute (like the night of the 23rd - eek), it ended up only being family.

Since I have an 'in' in the tile business, I had Duane cut some larger pieces of limestone into 4x4 square which work out nicely to be a coaster. You can also purchase the tiles from Lowe's or Home Depot, just make sure you use the unglazed version, otherwise the ink won't stay.

I used Craft Ink which doesn't dry as fast, and works better on surfaces other than paper. Once I stamped the image, I coated them with a layer of clear embossing powder. Tap off the excess powder and then pop in the oven. Yep - you read right, the oven. Bake them at 350 degrees for approximately 10 minutes, or until all of the inked images appear shiny and embosseed.

Take them out of the oven, and allow to cool. Then I put a layer of cork on the back so that the coaster doesn't scratch the surface of whatever it happens to be sitting on. This cork I found at Hobby Lobby, and came in a large roll. I cut it to 3.5x3.5 so that they fit nicely on the back of the coaster.
Tie them all together with a pretty ribbon and you have a great home-made gift that is already packaged! I was really happy with the way they turned out, and was able to use my Stampin' Up! stuff in a 3-d practical way!
Let me know if you would be interested in doing a tile coaster class. Even without the monogram, they would make a great gift, and something that you could just have on hand if you needed a 'quick' gift for something!
Tile Recipe:
Stamp Set: Friendship Blooms (Retired)
Ink: CRAFT: Old Olive, Ruby Red, Chocolate Chip, Creamy Carmel
Other: Limestone Tiles

Sunday, December 21, 2008

Banana Bread, anyone?

My favorite bread recipe in the whole world is my banana bread recipe, and usually disappears very quickly. I typically make it in my bundt pan, and even though it makes an awful lot of banana bread, when I take it to work, it is usually gone by 10!


So, I needed a couple of hostess gifts this week and saw these disposable loaf pans at Wal-Mart and thought if I split the batter up, would make great hostess gifts. With a little help from my kitchen gu-ru, I was able to adjust the cooking time for the 3 loafs.


I put some Cardstock, Designer Paper and ribbon around it with a little embellisment, and wa-la....a perfect hostess gift!


Recipe:
Cardstock: Old Olive, Chocolate chip
Ink: Chocolate Chip
Stamp Set: Winter Post
Accessories: Chocolate Chip Felt Ribbon, Naturals Twine, Scallop Circle Punch, 1 3/8" punch, 1 1/4" punch

Monday, December 15, 2008

Post-it Note Gift


Well, I have finally finished the gifts for all the 'girls' at work. Last year I made them scarves (which some of them actually still wear....warms my heart!), and I really had a hard time coming up with something to make them this year. What could I make that I would be able to duplicate (times 12) that was relatively easy to do, and I could do so without spending a lot of money? I found these little post-it holders online, and just knew that they would be the perfect gift!!


The base of the post-it holder are 2 3.5" square coasters. Where would I find such an item, you ask? I found them online 'somewhere'....I'm sure I could do it again if requested. :) The paper that I used is all the retired stuff from last year Afternoon Tea, Wild Wasabi and Groovy Guava. I cut out the flowers using my Cricuit which is a great little (okay, not so little) tool that Duane bought me. Funny story around that....we were snowmobiling in West Yellowstone, saw an infomercial on tv about the Cricuit and ended up picking one up in Bozeman on the way back home.

I digress.....Here is the photo of the inside of the holder. Did I do a good job of matching the post-it notes with the paper? I don't think Groovy Guava is quite the same as the bright orange, but it works!! They were very simple to make, but I do have a word of advice if you are thinking of making them yourselves....the designer paper doesn't like to stick very well folded around the edge of the coaster, and I will reccomend Sticky Strip to make sure the job gets done. Otherwise, the paper seems to 'jump' off the coaster, and you will find yourself with a strangely non-functioning accordian. Trust me, I speak from experience!

Hope none of you work girls happen upon this before I had them out next week at work....

Recipe:
Stamps: None!
Ink: None!
CardStock: Groovy Guava
Accessories: Afternoon Tea DSP, Wild Wasabi Ribbon, Rub-ons, Dimensionals, non-SU brad