Friday, April 3, 2009

Get well soon, Grandpa!

My grandpa has been in and out of the hospital with heart and lung related problems, and yesterday they put him in the nursing home. We are hoping that it is a temporary move, but those moves rarely are. He is a HUGE fan of my cards, and I know it just makes his day to receive one in the mail. So...duty as eldest grand-daughter calls!

This card turned out fantastic, and I just LOVE the colors. The designer paper is the new Walk in the Park that can be found in the new Occasions Mini!! The butterfly is also from the Mini - it is a fabulous catalog! The butterfly is also embossed - I seem to be on an embossing kick these days!

Hope you like it! Please keep my grandpa in your thoughts!

Card Recipe:
Stamp Set:
Great Friend (Occasions Mini), Sweet Little Sentiments
Ink: Versamark, Basic Gray
Paper: Basic Gray, Cameo Coral, Baja Breeze, Whisper White, Walk in the Park DSP
Accessories: Baja Breeze Ribbon, Word Windo Punch, Dimensionals, White Embossing Powder

Thursday, April 2, 2009

Happy Birthday Phyllis

Today is Duane's momma's birthday. I am mailing this card today, so she won't get it until after her birthday - eek! Somehow the flip of the calendar snuck up on me, and I was not prepared for April birthdays already! She will also be getting some flowers, so hope she forgives us! :)


You may recognize the layout of this card to be similar to the one I did here. I just love the layout, and was easy to do in a pinch! I think the black embossing is just so elegant, and love the Riding Hood Red with the black!

The sentiment is one of the new stamp sets that can be found in the Occasions Mini, Great Friend. Please contact me if you need a copy!

Card Recipe:
Stamp Set: Fifth Avenue Floral, Great Friend
Ink: Versamark
Cardstock: Riding Hood Red, Whisper White, Basic Black
Accessories: Riding Hood Red Ribbon, Dimensionals, Black Embossing Powder, 1 3/8" Circle Punch, Scallop Circle Punch, Paper Piercer

Monday, March 30, 2009

Missing!

Hey! Sorry I have been missing for so long. Seems like we have had a lot going on, and I just haven't been able to stamp much lately. I do have some Easter things to show you soon though!

Wednesday, March 18, 2009

Coaster Tile gifts

Hey there! I had a few more stone tiles that I didn't want to pack up 'un-done', so I made a few sets of coasters as gifts. I have some occasions coming up that would work just perfect for!

These are so fun to make and so easy too! The hardest part is picking out the design! To seal the craft ink I embossed them with clear embossing powder and popped them in the oven. You may be able to see the shine to the images.

Here are the two designs:

Recipe:
Stamp Set: Great Friend (Occasions mini)
Ink: ALL CRAFT: Creamy Caramel, Old Olive, Ruby Red
Accessories: Clear Embossing Powder


Recipe:
Stamp Set:
Fifth Avenue Floral, Botanical Blooms (SAB)
Ink: ALL CRAFT: Creamy Caramel, Chocolate Chip, Ruby Red
Accessories: Clear Embossing Powder

On the back of each coaster I attached some sticky sided cork board. I found this at Hobby Lobby and cut it so it was slightly smaller than the tile. You could also use the small round or square pieces too if you wanted.


Here is how I packaged them up. I wrapped them with ribbon (that I also found at Hobby Lobby). Stampin' Up! doesn't have the organza ribbon and I think that looks the best wrapped around the coasters. I like that the ribbon doesn't cover up the images on the tile.

So - anyone interested in a tile class? I would love to help you make super cute gifts for your friends and family. You could personalize them with initials like the ones I did here for Christmas. Contact me if you want me to hold a coaster class!

Tuesday, March 17, 2009

Happy St. Patty's Day

Okay, so I'm not Irish, I don't really like green, and I can't see investing in a St. Patrick's Day stamp set. So....where does that leave me for a work treat? Luckily, I like hearts, and if you take four of them, and arrange them with the points facing in, you are left with a 4 leaf clover....! What a novel idea. And what candy would be better than a peppermint patty? None! So here are the treats for the work peeps....


Side view of the yummy chocolate! Make sure that you use a glue dot to adhere to the chocolate so that it stays!


Happy St. Patty's Day!


Recipe:
Stamp Set: NONE
Ink: NONE
Cardstock: Glorious Green, Summer Sun, Whisper White
Accessories: Glue dots, Scallop Circle Punch, 1 3/8" Circle Punch, 1 1/4" Circle Punch, Heart to Heart Punch, Paper Piercer

Monday, March 16, 2009

I'm turning into my mother?

This stamp makes me laugh! I don't know that I am turning into my mother yet....not that it would be a bad thing because she is a great lady. And I think when I send this to her, so is going to LAUGH! She has been going through a rough time lately, and this might be just the thing to perk her up. I mean, really, who doesn't glitter perk up?? :)

(This is a stamp set offered in the Occasions mini, and is part of the sneak peak!)

I used a sketch for this one - SC116. Always a great way to get an idea for a layout!

I really like the way this turned out, and just love these colors together. I used my Color Coach to get the color combination - that thing never does me wrong! A great tool to have if you are having trouble coming up with a color scheme!!


Can you see on the Pixie Pink there are some versa-marked flowers from Botanical Blooms? Hope you are enjoying the sneak peak for the Occasions mini....more to come!

Card Recipe:
Stamp Set: Eight Great Greetings (Occasions Mini), Botanical Blooms (SAB)
Ink: Basic Black, Versamark
Cardstock: Pixie Pink, Certainly Celery, Whisper White
Accessories: Delicate Dots Designer Paper (SAB), Certainly Celery Ribbon (SAB), Brads, Pink Fine Cosmo Glitter, Dimensionals

Sunday, March 15, 2009

Easter Card #1

Stampin' Up! has given us a sneak peak for their Occasions Mini Catalog. And boy is it awesome! There are some FABULOUS stamp sets in there that I just couldn't wait to get my hands on. You can find the sneak peak items here. The items they are 'sneak-peaking' are to help you get ready for Easter. The entire catalog will be available April 1st. If you need a copy of it, please let me know!

So I thought I would sit down and creat the Easter card we send out to our family. I made 3 different versions. This is the 1st (I decided to send out #3), and #2 will be made in April club. All are using the same color scheme, just mixed up!

The bunny is from Eight Great Greetings, which is in the Occasions Mini. Pretty straight forward - LOVE the colors! :)


Just love the little bunny holding all the eggs! Reminds me of the time my sis and I colored hard-boiled eggs and she told me the pink dye was juice.....it did NOT taste good.

Card Recipe:
Stamp Set: Eight Great Greetings (Occasions Mini)
Ink: Basic Black, So Saffron, Regal Rose, Bashful Blue, Almost Amethyst, Certainly Celery
Cardstock: Regal Rose, Bashful Blue, Confetti White, Certainly Celery
Accessories: Delicate Dots Designer Paper (SAB), Dimensionals, So Saffron Ribbon (SAB), Scallop Edge Punch, Crop-a-dile, Corner Rounder Punch

Friday, March 13, 2009

Stationary Box

Who doesn't love a great gift idea to a friend? This will be a gift for a good friend (it is a VERY late gift....her birthday was in January). The box contains 8 cards, and I used 2 different color cominbations for the cards.

I am attempting to use up some of my designer paper so that I don't feel guilty about opening a new package. I just love the Candy Lane Designer Paper, although most of it looks very "Valentine-y". Some of the prints are mono-chromatic and make for a very elegant card. I also used 3 of the different Sale-A-Bration stamps. I skipped the sentiment so she can use them for whatever occasion she needs them for!


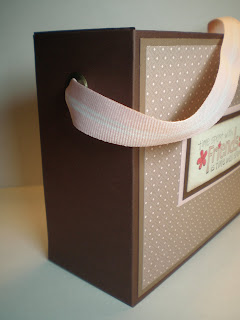
This is the stationary box that I made them to go inside of. To make the box: You will need 2 pieces of cardstock that measure 11x7.5. Score them at 2.5" on each side, and cut the 2.5" score line to form the bottom of the box. Make sure you use Sticky Strip to put the box together so it stays!!


Here is a side view of the box. You can see that I used the Jumbo Eyelets to make the handle with the Pink Pirouette ribbon, knotted on the inside of the box.

Recipe:
Stamp Set: Polka Dot Punches, Time Well Spent (retired)
Ink: Close to Cocoa, Chocolate Chip, Pink Pirouette, Riding Hood Red
Cardstock: Riding Hood Red, Pink Pirouettte, Chocolate Chip, Close to Cocoa, Very Vanilla
Accessories: Chocolate Chip Felt Alpine Ribbon (retired), Candy Lane Designer Paper, Metallic Eyelet, Dimensionals, Scallop Circle Punch, 5 Flower Punch, Silver Brad, Flower Fusion, Jumbo Pewter Eyelet, Pink Pirouette Ribbon
Technique: Sponging

Hope you enjoyed my little stationary box! It was so fun and easy to make, and I think she will just love her gift!

Thursday, March 12, 2009

Hostess Gift Candy Box

Stamp club was last night, and this was the hostess gift for Bridgett. I love decorating up some candy, and this little box is perfect to do that with some chocolates! And I didn't even eat any of them while making the treat! That is will power!!

These containers I purchased online, and figured it was about time to fix it up! The Good Morning Sunshine Designer Paper is just the funnest! And I love using the Crimper to dress up a package! The candies are the Hershey's Nuggets wrapped in the designer paper (measures 1"x3").

Recipe:
Stamp Set:
Yummy (SAB)
Cardstock: Summer Sun, Pacific Point
Ink: Pacific Point
Accessories: Crimper, Good Morning Sunshine Designer paper, Small Tag Punch, Large Tag Punch, Metallic Eyelets, Linen Thread
Technique: Sponging, Crimping

Wednesday, March 11, 2009

March Stamp Club

It is stamp club time again! We are making some wonderful things - 3 full size cards this month! Contact me if you want to join - you could make all these great things for free!!


The first card is for St. Patrick's Day. I don't really do green beer, I'm not Irish, and don't have a St. Patrick's day stamp set. So - I improvised - and you can do with some strategically placed hearts! I am also using the bleaching technique, which turned out different than I thought - but interesting! They are they punched out with the Large Heart Punch. The lucky sentiment is from Define Your Life.


Recipe:
Stamp Set: Define Your Life
Cardstock: Certainly Celery, Glorious Green, Basic Black, Whisper White
Ink: Versamark
Accessories: Large Heart Punch, Natural Hemp Twine, Black Embossing Powder, Certainly Celery Ribbon (SAB), Dimensionals, Clips Assortment
Technique: Embossing, Bleaching

The next card uses the Gatefold, you have seen a different version of this card at this post. I actually created this club card first. I love these colors - the Sahara Sand with the Real Red is very striking. To create the Gatefold, cut your cardstock in half lengthwise, and then score at 2 3/4" from each side and fold in!
Recipe
Stamp Set:
Congrats (SAB)
Ink: Chocolate Chip
Cardstock: Sahara Sand, Whisper White, Chocolate Chip, Real Red
Accessories: Dimensionals, Kraft Taffeta Ribbon, Boho Punch, Brad, Delicate Dots Designer Paper (SAB)
Technique: Gatefold, Sponging

The last card is my favorite, by far. It uses one of my favorite techniques (sewing) and is a great way to use up all those scraps of designer paper that you just can't bear to throw out! Each of the square are 1"x1". I'm thinking that the 1 1/4" square punch would be an easier way to go about it, cuz it seems to be quite difficult to cut such a small piece with the paper trimmer. I sewed around the edge and then created the 'quilt' on the inside. The Hodgepodge Hardware in the designer label shape is awesome!


Recipe:
Stamp Set: Congrats (SAB)
Ink: Sahara Sand
Cardstock: Certainly Celery, Very Vanilla, Sahara Sand
Accessories: Very Vanilla Hodgepodge Hardware Designer Label, Designer Label Punch, So Saffron Ribbon (SAB), Naturals Hemp Twine, Dimensionals


So - that's it. See ya tonight!