Saturday, November 6, 2010

A new look at ribbon

Looking for a new way to show off your ribbon? How about all bunched up? Thanks to my stamping pal Lisa, I gave this technique a try. It is super fun, and totally do-able with any ribbon! Take your sticky strip and run it across your card, then adhere your ribbon and bunch it up as you go along. My advice to you when you try this at home - Don't try to bunch up too much ribbon, otherwise it won't stay stuck for the card. The morning after I did this card, the ribbon had jumped right off the card!!

Recipe:
Paper: More Mustard, Chocolate Chip, Retired Fall DSP, Whisper White
Stamp Set: Teeny Tiny Wishes
Accessories: Dimensionals, 1 1/4" Circle Punch, 1 3/8" Circle Punch, 1 3/4" Circle Punch, Retired Ribbon

Thursday, November 4, 2010

Now how about a little bling?

What is more fun than texture and bling? Not much, right? This card gives you a little of both!! Love the Embossing folders - GREAT way to add some texture to your card and make it really pop. And how can you not love a great big flower and a little bling? No sentiment on this one - which makes it a great card to have on hand, and you can add an occasion specific sentiment on the inside!

Recipe:
Paper: Basic Gray, Yo-Yo Yellow (retired), Whisper White
Accessories: Basic Gray Satin Ribbon, Rhinestone Brad, Flower (non-SU!), Perfect Polka Dots Embossing Folder, Big Shot, Dimensionals

Tuesday, November 2, 2010

Welcome back

Welcome back everyone! Oh, wait. I should welcome myself back! I fell into a little bit of a creative slump when the basement flooded, but my mojo is back!

Cards are a great gift for a special someone over the holidays. How about a package of notecards or thank-you cards? These cards are by special request for some masculine cards. I know this is always a difficult "genre" for me, as I like lots of bling and sparkle. Not necessarily something those male types like in a card.

These cards use very masculine designer paper, tied up with hemp twine (just like my Halloween cards) or knotted ribbon (which seems to be more manly than a bow). Then I used Rub-ons for the sentiment. GREAT way to add a little "oomph" to your cards without stamping!

Recipe:
Paper: Chocolate Chip, Close to Cocoa, Retired Fall DSP
Accessories: Chocolate Chip Ribbon, Chat Room Rub-on


Recipe:
Paper: Crumb Cake, More Mustard, Retired Fall DSP
Accessories: Hemp Twine, Chat Room Rub-on

Sunday, October 31, 2010

Happy Halloween!

Happy Halloween everyone! Time for the holidays! Halloween always is the start of the holiday season for me, which means the next 2 months are going to go fast! Love the smell of fall!

Need a great way to use up small scraps of Designer Series Paper that you just can't part with? This is perfect! I had a few scraps of Halloween paper from years past, and mixed em up to make this card! The 1 1/4" square punch is a great tool to have to maximize your paper! ;0)

Hope everyone has a Happy Halloween - weather should be great for trick or treaters - bring on the kiddos!


Recipe:
Paper: Kiwi Kiss, Basic Black, Whisper White, Retired Halloween DSP
Ink: Basic Black
Stamps: Teeny Tiny Wishes
Accessories: Hemp Twine

Tuesday, June 8, 2010

June Club

Club time girls! This month we are going to work on some techniques - per your request! This first technique is called "Emboss Resist" and is really quite fun! You can find an easy tutorial here.


Recipe:
Stamp Set: Great Friend
Ink: Old Olive (Craft), Basic Black, Versamark
Paper: Old Olive, Whisper White, Basic Black
Accessories: 1 1/4" Square Punch, Black Brads, Clear Embossing Powder

This next one uses a couple of new products: stencils and Schmootz Spritz. Pretty fun! You can use the stencils on paper, fabric, anything around the house to "alter".


Recipe:
Stamp Set: Teeny Tiny Wishes
Ink: Cameo Coral
Paper: Whisper White, Cameo Coral
Accessories: Oval Punch, Scallop Oval, Schmootz Spritz, Dimensionals, Stencil

This next card we are doing "scratch-n-sniff". Yep, you read it right. Mix clear embossing powder will kool-aid. You can find the tutorial here. We are also doing a fun little pocket with the Top Note Die. (Sorry about the sideways card - my camera broke, and am using my backup. I can't get my computer to rotate the image).


Recipe:
Stamp Set: Party Hearty
Ink: Real Red, Chocolate Chip, Versamark
Paper: Kraft, Close to Cocoa, Very Vanilla, Flock Together DSP, Real Red
Accessories: Top Note Die, Big Shot, Real Red Satin Ribbon, Dimensionals, 1 3/8" Circle Punch, 1 3/4" Circle Punch, Chocolate Chip Ribbon, Linen Thread
See you Wednesday for club ladies!

Tuesday, June 1, 2010

It's that time again . . .

Yep! Time for the "Last Chance" List! These are all the stamp sets and accessories that will be retiring at the end of the month. Keep in mind - the stamp sets are available through the end of the month. The accessories are first come, first serve. So if there is something you are dying for - order up! Please email me if you want to order!!

Here are all the lists (Click on the link to pull up the list!).

Last Chance Stamp Sets

Last Chance Definitely Decorative (note that these are all 25% off!!!!)

Last Chance Accessories

So - take a look and take advantage of all the retiring items before they are gone! Time to stock up! And you know what this means . . . . come July 1 we have a brand new catalog with many many fabulous items in it!!!!!

Sunday, May 16, 2010

Notecards

Retiring colors - everywhere! Check out some ofthe retiring colors here. Need some before they are gone? They retire June 30, 2010, so make sure you get em before they are gone!

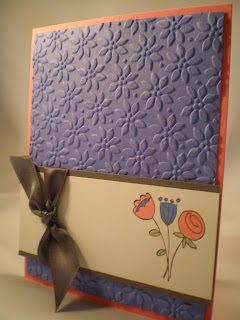
Here are some cards using some of the retiring colors. How great would a set of 4 notecards be for a gift for someone with envelopes? I have some made already if anyone wants to purchase! The embossing folders add great texture to any project! Don't have a Big Shot? You NEED one!


Recipe:
Stamp Set: Happy Moments (Retired)
Ink: Basic Gray, Cameo Coral, Lovely Lilac
Accessories: Big Shot, Dimensionals, Basic Gray Satin Ribbon, Embossing Folder


Recipe:
Stamp Set: Happy Moments
Ink: Chocolate Chip
Paper: Whisper White, Chocolate Chip, Mellow Moss, Really Rust
Accessories: Dimensionals, Chocolate Chip Ribbon, Big Shot, Embossing Folder


Recipe:
Stamp Set: Happy Moments
Ink: Basic GrayPaper: Whisper White, Basic Gray, Summer Sun, Lovely Lilac
Accessories: Dimensionals, Basic Gray Ribbon, Big Shot, Embossing Folder


Recipe:
Stamp Set: Happy Moments
Ink: Basic Gray
Paper: Whisper White, Basic Gray, Brilliant Blue, Taken with Teal
Accessories: Dimensionals, Basic Gray, Big Shot, Embossing Folder

Also, don't forget to check out the clearance rack. There are some STEALS!!

Friday, May 14, 2010

Mom's purse

Long before I ever created a card, or papercraft of any kind, I sewed. Mom taught me, and then I learned to quilt. So how awesome for me to discover that I can use my BIG SHOT for quilting? I was ecstatic. As you all know, it cuts fabric, and cuts the most perfect sized squares for quilting usng the Scallop Square Die. It is quite easily the most fabulous die you can buy for your Big Shot!

So, for Mother's Day, I whipped together a purse. I actually made one a month back, and gave it away without taking pictures. I know! So, here's the purse:


Inside lining:


Close up of the ruffle and quilting:

So, whatcha think? Pretty awesome, huh? What are your thoughts on me holding a class where we all make a purse? No need to be overwhelmed - it is quite easy to put together! A fabulous demonstrator Angie Juda made a really easy video to follow!!

Tuesday, May 11, 2010

May Club

Can you believe May is already here?! Time for stamp club! This first project uses chalk - a medium that we don't use all that much (I have only used ine a handful of times), but I have found a really fun way to use them! This image is stamped with versamark, and then the chalk is applied with a sponge dobber. SOOO fun! Sorta looks like worn denim to me!!


Recipe:
Stamp Set: Medallion, Teeny Tiny Wishes
Ink: Really Rust, Not Quite Navy, Versamark
Paper: Very Vanilla, Really Rust, Not Quite Navy
Accessories: Sponge dobbers, Brads, Dimensionals

For the next project, I am doing something that we have never done in club before. The last 2 projects "go together". This was not the original plan, but because sometimes projects do not go according to plan - you improvise!

This little card purse is just adorable, and really easy to whip together. How about adding a couple of cards and you have a hand-made gift ready on the spur of the moment!! You can find the tutorial for the purse here.


Recipe:
Paper: Cottage Wall DSP, Orchid Opulance, Rich Razzleberry
Accessories: Rich Razzleberry Ribbon, brads, 1 3/8" Circle Punch, Circle Scallop Punch

And the last project is really 2 . . . I couldn't send you off with a card purse with only one card inside!! I just can't get enough of these embossing folders with the Big Shot!! Adds such great dimension to the project! We are also using Rub-ons - you have your choice of about a zillion different phrases! Rub ons are a great way to add a sentiment (or other element) to a card!


Recipe:
Paper: Rich Razzleberry, Orchid Opulance, Cottage Wall DSP, Whisper White
Accessories: Big Shot, Dot Embossing folder, Rich Razzleberry Ribbon, Dimensionals, Chit Chat Rub-ons
See ya tonight!

Who loves ribbon?

I do! I mean, who doesn't love ribbon? And how many of you hoard it, save it and can't bear to throw it away? I know it's you! Well, for all of you who have saved those scraps of ribbon, I have just the solution for you!! Use any punch - heart, star, scallop - whatever you have on hand! Adhere the ribbon to the backside (I used double stick tape) and assemble your card!

Recipe:
Paper: Crushed Curry, Bermuda Breeze, Whisper White
Accessories: Full Heart Punch, Ribbon: Bermuda Breeze, Melon Mambo, Crushed Curry, Rich Razzleberry