Showing posts with label Birthday. Show all posts

Monday, November 8, 2010

Window Pane Designer Paper

Window-pane designer paper is such a great way to showcase all of your designer papers all at once! I am just tickled with how this card turned out. Bright, cheery and full of character.

Recipe:
Stamp Set: Teeny Tiny Wishes
Ink: Chocolate chip
Paper: Summer Sun (retired), Pacific Point, Kiwi Kiss (retired),
Whisper White, Retired DSP
Accessories: Kiwi Kiss Ribbon (retired), hemp twine, 1 3/8" Circle Punch,
1 3/4" Circle Punch, Dimensionals, 1 1/4" Square Punch

Saturday, November 6, 2010

A new look at ribbon

Looking for a new way to show off your ribbon? How about all bunched up? Thanks to my stamping pal Lisa, I gave this technique a try. It is super fun, and totally do-able with any ribbon! Take your sticky strip and run it across your card, then adhere your ribbon and bunch it up as you go along. My advice to you when you try this at home - Don't try to bunch up too much ribbon, otherwise it won't stay stuck for the card. The morning after I did this card, the ribbon had jumped right off the card!!

Recipe:
Paper: More Mustard, Chocolate Chip, Retired Fall DSP, Whisper White
Stamp Set: Teeny Tiny Wishes
Accessories: Dimensionals, 1 1/4" Circle Punch, 1 3/8" Circle Punch, 1 3/4" Circle Punch, Retired Ribbon

Tuesday, March 9, 2010

Lots of layers - I'm back. hehe. This card was fun to do - although not a card you want to mass produce with all the cutting and punching. :) Fun way to show how the DSP and the stamps compliment each other!

Recipe:
Stamp Set: Teeny Tiny Wishes, Trendy Trees
Ink: Chocolate Chip, Old Olive, Pumpkin Pie
Paper: Old Olive, So Saffron, Pumpkin Pie, Whisper White, Welcome Neighbor DSP
Accessories: So Saffron Ribbon, 1 3/8" Circle Punch, 1 1/4" Circle Punch, Word Window Punch

Monday, February 8, 2010

A Bermuda Birthday

Happy birthday to one of my fellow stampers, Bridgett! This is a birthday wish all the way from the Caribbean (Don't worry - I scheduled this before we left). And of course I had to use Bermuda Bay paper! This stamp set is a Sale-a-bration set, as is the punch (FUN!).

Recipe:
Stamp Set: Happy Moments (SAB)
Ink: Basic gray
Paper: Bermuda Bay, Crushed Curry, Melon Mambo, Whisper White, Welcome Neighbor DSP (SAB)
Accessories: Dimensionals, Melon Mambo Ribbon, Scallop Trim Border (SAB), Paper crimper, Round Tab Punch

Saturday, October 24, 2009

Hooked on Fishing

Today is Duane's sister Trudy's birthday. And boy does she love to fish! Even more than Duane. I bought this stamp set a few years back becuase it works perfect for so many people in our families who love fishing!

This card turned out just the way I wanted it to. Originally I was going to sew on the card instead of use ribbon, but found I didn't have any brown thread. Ribbon works well in the space! The Mellow moss layer is dry embossed through my Big Shot which gives great dimension.


Here is a close up of the card. You can sorta see the dots on the Moss layer. Also - what do you think of the clip next to the fly? Kinda like a fish hook, right? (Remember they are on sale through Sunday if you want to get any.) Came together quite nicely, and hope she likes it.

Happy Birthday Trudy!

Recipe:
Stamp Set: On the Fly (retired), Family Phrases
Ink: Chocolate Chip
Paper: Close to Cocoa, Very Vanilla, Mellow Moss, Chocolate Chip
Accessories: Chocolate Chip Ribbon, Assorted Clips, Dimensionals, Sponging

Wednesday, October 14, 2009

Cottage Birthday

Well, I have gotten a little behind in my birthday cards - egads! Seems as if I haven't gotten into a good rhythm here with chores, and cards, etc. Anyways, for those of you who I have missed, sorry - cards are on the way!

This is such great designer paper, and makes super great birthday cards! I love the colors! I used my Big Shot a bunch on this card - such a great versatile tool - a must have! :) I also got out my Pretties kit, which I haven't used yet for the flower and the pearl. Hope you like!

Recipe:
Stamp Set: Best Yet (retired)
Ink: Rich Razzleberry, Old Olive
Paper: Orchid Opulance, Whisper White, Old Olive, Cottage Wall DSP
Accessories: Pretties Kit, Rich Razzleberry Ribbon, Top Note Die, Texturz Plate, Curly Label Punch, Dimensionals

Wednesday, August 26, 2009

Born to Ride

Today is Duane's birthday! Happy birthday babe! He is out of town, so he will get this card when he returns. Many of you may know that we LOVE (and especially Duane) to ride our Harley Davidson motorcycles! For Duane's gift this year, I did something Harley related, so I wanted his birthday card to reflect the same.Now this stamp set is OLD! I had seen someone use it on Splitcoast a long, long time ago, and after lots of looking, found a demonstrator that was selling it and I scooped it right up! So, the stamp set is retired, as is most of the paper that I used for the card, but I do have a fun technique to show you for the inside.The card is a basic gate-fold with a belly band, which I think turned out terrific!!


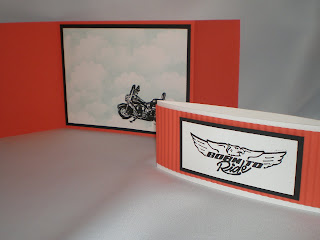
I think the Tangerine Tango is a perfect Harley color, and the Halloween paper from last year is a perfect match! Here is a shot with the card opened, and the belly-band next to it.


Now here is a close up of the center of the card and the new "technique" I want to show you. Can you see how it looks like there are clouds behind the motorcycle (which is embossed)? Take your scallop circle punch and punch it out of some scrap card stock. Then take a light blue (I used Soft Sky, but you could use Bashful Blue as well) and sponge up and over the top of the scallop circle. Do this all over your card until your space is filled in with the number of clouds you want. Cool, huh?


Recipe:
Stamp Set: Born to Ride (retired)
Ink: Versamark, Soft Sky (retired)
Paper: Tangerine Tango (retired), Basic Black, Whisper White, Ghostly Greetings DSP (retired)Accessories: Crimper, Black Embossing Powder, Scallop Circle Punch
Technique: Crimping, "cloud-making", Embossing

Happy Birthday babe!

Born to Ride

Today is Duane's birthday! Happy birthday babe! He is out of town, so he will get this card when he returns. Many of you may know that we LOVE (and especially Duane) to ride our Harley Davidson motorcycles! For Duane's gift this year, I did something Harley related, so I wanted his birthday card to reflect the same.

Now this stamp set is OLD! I had seen someone use it on Splitcoast a long, long time ago, and after lots of looking, found a demonstrator that was selling it and I scooped it right up! So, the stamp set is retired, as is most of the paper that I used for the card, but I do have a fun technique to show you for the inside.

The card is a basic gate-fold with a belly band, which I think turned out terrific!!

I think the Tangerine Tango is a perfect Harley color, and the Halloween paper from last year is a perfect match! Here is a shot with the card opened, and the belly-band next to it.

Now here is a close up of the center of the card and the new "technique" I want to show you. Can you see how it looks like there are clouds behind the motorcycle (which is embossed)? Take your scallop circle punch and punch it out of some scrap card stock. Then take a light blue (I used Soft Sky, but you could use Bashful Blue as well) and sponge up and over the top of the scallop circle. Do this all over your card until your space is filled in with the number of clouds you want. Cool, huh?

Recipe:
Stamp Set: Born to Ride (retired)
Ink: Versamark, Soft Sky (retired)
Paper: Tangerine Tango (retired), Basic Black, Whisper White, Ghostly Greetings DSP (retired)
Accessories: Crimper, Black Embossing Powder, Scallop Circle Punch
Technique: Crimping, "cloud-making", Embossing
Happy Birthday babe!

Wednesday, August 12, 2009

Stamp club

It's that time again! Stamp Club! Oh my it has gone fast, and my posts have been far and few between. Hopefully I will feel 'put together' enough to enjoy some down time soon! I had a few requests last month for techniques and/or products to use at this next stamp club, and I did my best to comply.

The first was how to use the Stamp-a-ma-jig. This is a great tool to use for those hard to position stamps. Also great to use if your sentiment is always crooked. Its super easy to use. You first ink your stamp and and stamp it onto the transfer sheet. Then use this sheet to position your stamp-a-ma-jig on the paper to place your image perfectly.

This little pocket is so perfect for a little note, a gift card, or whatever little treat you want to give someone. You know how I love those! The base is one of the medium standard SU! envelopes cut in half!

View of the inside envelopes:
Recipe:
Stamp Set: Trendy Trees, Teeny Tiny Wishes
Ink: Old Olive, Chocolate chip, So Saffron
Paper: Old Olive, Old Olive DSP, Naturals Ivory, So Saffron
Accessories: Dimensionals
Technique: Sponging

This next project incorporates 2 of the requests (sorta). Tearing is something that we hadn't done in awhile, and I put a little twist on tearing. Instead of tearing the cardstock, just scratch your fingernail along the edge to give it that 'rough' look. I kinda like it better than tearing. This card also uses the Circle Scissor Plus. Now, this is a great tool to make any size circle you desire!
Now the trick to using this tool is to use just a dab of adhesive to make sure your paper sticks to the glass base. As long as you secure the paper, you should have no problem cutting a perfect circle everytime!

Now, this card is a little out of my comfort zone, but we all need to try that once in awhile, right? It is very monochromatic, which is not something that I attempt very often. Now, my house is all very neutral, but my cards definitely aren't. :)


Recipe:
Stamp Set: Winter Post
Ink: Soft Suede
Paper: Kraft, Chocolate chip, Naturals Ivory, Kraft DSP
Accessories: Dimensionals
Techniques: Sponging, Rough tearing, Circle Scissor Plus

The last project is super fun! A purse! The base is your typical lunch sack. I'm sure you have a few of those hanging around your kitchen that you would love to turn into a beautiful little project, right? Its pretty easy to accomplish, and turns out oh so cute!
Here is the side view. You can see the lunch sack:

Recipe:
Stamp Set:
Family Phrases
Ink: Garden Green
Paper: Garden Green, Very Vanilla, Tempting Turquoise, Flock Together DSP
Accessories: Oval Punch, Oval Scallop Punch, Fillagree brads, dimensionals, So Saffron Ribbon, Lunch sack

See ya tonight!

Saturday, August 8, 2009

Happy Birthday Sissy

Okay, so her birthday was on Tuesday, but we are in Bozeman now celebrating with her. We started off today by running a 5k! Anyways, onto the card.

I wanted to use some of the new DSP that this new catalog has to offer. I was instantly drawn to this color combination - LOVE green and purple together! I will admit, that this card was a work in progress. Started with the paper and the Top Note die and then just added embellishments and paper until it passed approval! Whatcha think? I think I am in love with buttons!


Recipe:
Stamp Set:
Teeny Tiny Wishes
Ink: Rich Razzleberry
Paper: Old Olive, Orchid Opulance, Rich Razzleberry, Whisper White, Cottage wall DSP
Accessories: Dimensionals, Top note die, Bit Shot, Oval Punch, Oval Scallop Punch, Old Olive Playground buttons, Rich Razzleberry ribbon
Technique: Sponging

Happy birthday sis!

p.s. Do you have Teeny Tiny Wishes yet? You'll use it for everything!!!

Sunday, July 26, 2009

I'm baaaaack!!!

Yep, that's right! I am back! My room is unpacked and organized enough to do cards, and so i sat down and did a few last night! I hope you like! I missed a few birthdays (the horror) in July, so I made a few of these to send and make up for all those who I missed.

I just LOVE how this card turned out! A little more time consuming that I would have liked, but well worth it in the end, don't you think? The cupcakes are from The More the Merrier and are just the cutest. I stamped them individually on the cardstock in Versamark and then embossed with white embossing powder. Then cut them out and put them up on blocks on the 1 1/4" block of paper! I also broke out my sewing machine to do a little stitching! Super fun!

Recipe:
Stamp Set: The more the merrier, Party Hearty
Paper: Dusty Durango, Whisper White, Brocade Blue, So Saffron, Certainly Celery, Riding Hood Red
Ink: Versa mark, Riding Hood Red
Accessories: Dusty Durango Ribbon, White embossing powder, sewing machine
Technique: Sewing, embossing
Feels good to be back! Hope you enjoy!

Friday, July 24, 2009

July Club

I know, I know. This is old stuff. I wanted to get it up on the blog. New stuff over the weekend, I promise!!

First card is the oh so yummy birthday card with the Liquid Applique. Have you all gone out and bought some? It is SOOO fun! Can't wait to use it on snowmen! Also trying out some of the new In Colors - I think they will be fun!


Close up of those yummy cupcakes! :) You can see the Crystal Effects on the cherry!

Recipe:
Stamp Set: The More the Merrier (Hostess)
Ink: Basic Black, Melon Mambo, Crushed Curry, Real Red, Old Olive
Paper: Melon Mambo, Crushed Curry, Whisper White
Accessories: Crushed Curry Ribbon (double sided), liquid applique, crystal effects, Scallop Edge Punch, Paper Piercer, Dimensionals, Horizontal Slit Punch

The next card is a super fun 3-d fold card. Start with a square piece of paper, which ever size you choose (this is an 8x8), and score in half on both sides. Cut from the edge to the middle on one of those score lines, and then score a 45 degree angle on the adjoining square.

Another fun In Color - Bermuda Bay (makes me think of vacation) goes great with Apricot Appeal!!


I ended up sending this in Duane's overnight bag on one of his trips out of town. I always like to put a little card in there along with some candy! :)


Recipe:
Stamp Set: Admit It, Love you Much
Ink: Bermuda Bay, Chocolate Chip
Paper: Bermuda Pay, Apricot Appeal, Apricot Appeal DSP, Whisper White, Chocolate Chip
Accessories: Dimensionals, Chocolate Chip Ribbon

Okay, this last card is a little crazy! Known as the "Tri-shutter" card! Was super fun to do!
And here is the baby open!


Recipe:
Stamp Set: The More the Merrier
Ink: Chocolate Chip
Paper: Kiwi Kiss, Summer Sun, Whisper White, Good Morning Sunshine DSP (retired), Pacific Point
Accessories: Big Shot, Build a Daisy, Large Brads, Pacific Point Ribbon

Okay, that was club! Check back this weekend for new and fabulous things! :)

Saturday, June 6, 2009

Happy Birthday Padre!

Today is Padre's birthday! Happy Birthday to Padre! It is kinda a big one, but since there may be a possibility that I have a big one coming up in the next few years, my lips are sealed.

He loves the Broncos, and in fact named his new puppy Elway! Don't you love it?! So I knew I needed to use orange and blue for his birthday card! And Liquid Applique is MY FAVORITE!! Something about watching it puff up right in front of your eyes is awesome! You gotta try it!


The DSP is retired from the Fall/Winter catalog, the Halloween paper. It was the only DSP I had that had Tangerine Tango in it!

Sorry I'm gonna miss your birthday, Padre! We'll celebrate when we get back!

Recipe:
Stamp Set:
Crazy for Cupcakes
Ink: Black Stayz-on, Brilliant Blue, Tangerine Tango, Bordering Blue
Paper: Tangerine Tango, Brilliant Blue, Whisper White, Spooky Nights DSP
Accessories: Tangerine Tango Ribbon, Liquid Applique, Dimensionals

Sunday, May 31, 2009

Good Morning Sunshine

Okay, this paper is LOUD! I love the colors and how bright it is! It is very retro, which I am usually not, and it surprises me how much I like to use it! Good to get out of your box sometimes, ya know! :) Reminds me of the 70's....I LOVE the cordouroy buttons - one of my favorites - just attach with a glue dot!!

I have been using my Family Phrases set a lot lately - I think it has GREAT sentiments and they are in a very 'casual' font - perfect for a fun card like this!


Recipe:
Stamp Set:
Family Phrases
Ink: Chocolate Chip
Paper: Pacific Point, Whisper White, Kiwi Kiss, Good Morning Sunshine DSP
Accessories: Pacific Point Cordorouy button, Glue Dot

Friday, May 22, 2009

Happy Bird-day

Now, I have to say off the bat that this isn't my favorite color combination, but sometimes it is good to break outside of your box. And I am still struggling with water-coloring, but I think I am improving....

This is a card for the son of my dear friend, Kate. Her daughter's card can be seen in this post here. Her son turned 2 this week! Yikes!

I do love, love, love this stamp set! It can be so versatile, and works so well with children's birthdays. Let me know what you think of the colors.....

Recipe:
Stamp Set:
Pun Fun
Ink: Pacific Point, Kiwi Kiss, Basic Black, Tangerine Tango
Paper: Kiwi Kiss, Whisper White, Good Morning Sunshine DSP, Bashful Blue, Tangerine Tango
Accessories: Clip Assortment, Paper Piercer, Dimensionals, Tangerine Tango Ribbon

Wednesday, May 20, 2009

Happy Birthday to Lisa with a cherry on top!!

Well, this card is a little late! Her birthday was last week, so I hope she forgives me that it is arriving late! :) Lisa is one of my fabulous club gals and we have so much fun every month! I know she loves sweets, and although I am not sure about ice cream.....this card is just too cute.

The designer paper is retired from last catalog, but goes so well with the cherry in this stamp set. You could use the current Rockability paper for the same effect. Can you believe I sealed the envelope and THEN realized that I forgot to put the glitter on the cherry! The horrors! I had to rip open that envelope and fix my mistake. How could I forget the bling? (that is why your envelope looks chewed on, Lis!)


Here is a close up of the ice cream sundae with the cherry! Sure makes me want to have ice cream!!! Thank goodness the weather is finally cooperating for such a rendevous! I colored and shaded with Bashful Blue.

The greeting that goes with this particular stamp is too darn cute to leave out, but I ran out of room on the front of my card. So - message goes inside! Always a great option when the outside of your card is full of other fabulous things!

Hope you liked my card. Hope you had a great birthday, Lisa!

Recipe:
Stamp Set: Goodie Goodie Gumdrops
Ink: Basic Black, Real Red, Bashful Blue
Paper: Whisper White, Basic Black, Tart and Tangy DSP (retired)
Accessories: Paper piercer, Black eyelets (non-SU!), Real Red Ribbon, dimensionals

Thursday, April 16, 2009

Bloomin Birthday

Does this title remind you of the Bloomin' Onion from The Outback? You must be hungry!

This stamp set is just fantastic, and can't wait to make my Mother's Day cards with it. Check out the other stamps in this set here

This is a birthday card for my friend Carrie Beth. She loves to garden, and loves flowers, so I hope she likes this card - it reminds me of her! I paper pieced the wheelbarrow with chocolate chip, and the wheel for the wheelbarrow is a jumbo eyelet - I love it!


Card Recipe:
Stamp Set: Blooming With Love
Ink: Chocolate Chip, Baja Breeze, So Saffron
Paper: Baja Breeze, Chocolate Chip, Whisper White, Baja Breeze Designer Paper
Accessories: Chocolate Chip Ribbon, Small Tag Punch, Large Tag Punch, Jumbo Eyelet
Technique: Sponging

Monday, April 13, 2009

Time Well Spent

Today is my best gal pal, Lynsay's birthday. She and I go way back, and unfortunately we don't get to see each other often enough! I hope she likes this card - she is a very regular follower!

This stamp set is a retired Hostess set, but I just LOVE LOVE the saying. And it is very appropriate for her since we have to really take advantage of our time together! And she loves a little bling - whatcha think of the bling?

Card Recipe:
Stamp Set: Time Well Spent, Polka Dot Punches
Ink: Chocolate Chip, Regal Rose, Pumpkin Pie
Paper: Regal Rose, Pumpkin Pie, Chocolate Chip, Whisper White
Accessories: Rhinestone Brads, Pink Pirouette Ribbon, Clear Embossing Powder, Dimensionals
Technique: Sponging, Sewing Machine

Happy Birthday Girlfriend! :)

Monday, April 6, 2009

The Icing on the cake

The best part! My friend Tiff's birthday is today, and this is her birthday card. She lives in Sunny California, so I couldn't resist using some Apricot Appeal paper to make her card. This is another stamp from the Eight Great Greetings stamp set in the Occasions Mini Catalog. A fantastic set to have to get you through multiple occasions and holidays!

I used the Apricot Appeal DSP that can be found in the hostess paper pack in the current catalog. The Jumbo Grommet is in the Ocassions mini - and are so fun! You just use your bone folder to attach to your paper. Don't look too closely, though....this was my first one and I had some issues.....Can you see the 'icing' on my birthday cake? Its Crystal Effects!!!

Card Recipe:
Stamp Set:
Eight Great Greetings
Ink: Cameo Coral, Apricot Appeal
Paper: Cameo Coral, Apricot Appeal, Whisper White, Apricot Appeal DSP
Accessories: Jumbo Grommet, Paper Piercer, Crystal Effectds, Dimensionals, Whisper White Organza Ribbon

Thanks for stopping by!

Thursday, March 5, 2009

Happy Birthday Val and Sue!

Oh boy! Can you believe there is another birthday at the firm? Geesh - it seems like there is one about every other week. I suppose with 20 employees, the math kinda works out that way....

Both cards are twice the size of normal cards (a whole sheet of cardstock folded in half to make the card) since so many of us have to sign them.

The first card is a style I have used before, only this time I did it mono-chromatic, which I think is a very elegant look. Sue just loves purple, so I pulled out all the purple ink I have to bring this card together. I did find out that I don't have any Stampin' Up! ribbon....and that the only purple ribbon they sell is Elegant Eggplant? Guess I better be getting some of that....

Here is a shot with the vellum turned up at the corner. The vellum does a good job of muting the bold colors from underneath! I just love how the Simply Said stamp set looks underneath the vellum!!


Recipe:
Stamp Set: Simply Said, Party Hearty
Ink: Perfect Plum, Elegant Eggplant, Orchid Opulence, Lovely Lilac, Almost Amethyst, Black Stayzon
Cardstock: Almost Amethyst, Vellum, Whisper White
Accessories: Brads, Purple Ribbon (non-SU!)

The second card is for Val (or Shaniqua, depending on who you are). She is bold, loud and I thought the designer paper from the Good Morning Sunshine fit perfectly! I used the Gatefold card, which is really easy to do, and looks super cool!

Recipe:
Stamp Set: Congrats (SAB)
Ink: Chocolate Chip
Cardstock: Kiwi Kiss, Pacific Point, Chocolate Chip, Very Vanilla, Summer Sun
Accessories: Chocolate Chip Ribbon, Brad, Boho Punch, Dimensionals, Good Morning Sunshine Designer Paper
Technique: Sponging

Hope you like the birthday cards!