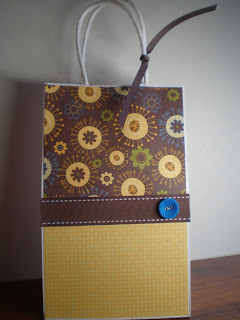
In this, the only item I used from SU! is the Fleurettes II. Scrap fabric, scrap ric-rac and a miscellaneous button . . . and you have a beautiful little wrap. Change the size of your fabric for the size of your gift. Easy peasy, right?! Hope you like! And totally re-useable!
Showing posts with label gift. Show all posts
Saturday, April 10, 2010
Fabric Gift Wrapping
Fabric gift wrap? Well, that sounds crazy, doesn't it? It is actually reall fun, really easy and totally GREEN! I figure - I drive an SUV, so I must do all I can to make a difference in other ways to save the environment. :)
In this, the only item I used from SU! is the Fleurettes II. Scrap fabric, scrap ric-rac and a miscellaneous button . . . and you have a beautiful little wrap. Change the size of your fabric for the size of your gift. Easy peasy, right?! Hope you like! And totally re-useable!
Tuesday, February 16, 2010
February Stamp Club
Back from vacation and back to stamping. And it's time for stamp club again!
This first card is a thank you card "note card" style. It gives you enough room to write a quick note to someone on just a card front. Easy way to create a bunch of thank you cards to have on hand! With a little 3-d flower in the corner by punch circles and then crinkling them up!

Now, punch art has been all over the place, and is SOOO fun to create little critters out of your punches! This super cute little sheep reminds me of spring and of Easter. He is sitting on a corner bookmark, which would make a great gift for a reader in your life!
See you tomorrow!
This first card is a thank you card "note card" style. It gives you enough room to write a quick note to someone on just a card front. Easy way to create a bunch of thank you cards to have on hand! With a little 3-d flower in the corner by punch circles and then crinkling them up!
Recipe:
Stamp Set: Family Phrases
Paper: More Mustard, Old Olive, Welcome Neighbor DSP, Sweet Pea DSP
Ink: Melon Mambo
Accessories: Dimensionals, Earth Elements Brad (More Mustard),
Chocolate Chip Ribbon, 1 3/8" Circle Punch, 1 1/4" Circle Punch,
1" Circle punch, 1/2" Circle Punch
Now, punch art has been all over the place, and is SOOO fun to create little critters out of your punches! This super cute little sheep reminds me of spring and of Easter. He is sitting on a corner bookmark, which would make a great gift for a reader in your life!
Ink: Basic Black (for sponging)
Paper: Sweet Pea DSP, Whisper White, Basic Black
Accessories: 1 3/8" Circle Punch, Scallop Circle Punch, Trio Flowers Punch,
Word Window Punch, Large Oval Punch, 1/2" Circle Punch, booglie eyes
This last one is a great little 'welcome to the neighborhood' gift! Fill it with cookies, candies, or some other kind of snack mix for someone new to the neighborhood! I loved getting those kinds of gifts when we moved!
Stamp Set: Sweet Season
Ink: Old Olive
Paper: Melon Mambo, Crushed Curry, Whisper White, Welcome Neighbor DSP
Accessories: Gift Bag (from Hobby Lobby), Wide Oval Punch, Dimensionals, Silver Brad, 3 flower punch, Silver Cord, Crushed Curry Ribbon, Horizontal Slit Punch
See you tomorrow!
Friday, November 20, 2009
Soup Can Gift
Do you have a member of your family that just can't keep their hands off the presents? Who just can't resist peeking and pulling at the paper? Well, that is my sister, believe it or not! We all love to guess our presents, and over the years she has gotten a bad rap for peeking and pulling before the big open.
So . . . . I wrapped her present in a soup can! Yep, a soup can. I have one of those 'safe' can openers that cut along the edge of the can and create a clean edge. So after I washed out the soup can, I inserted her present and then sealed the top with Crystal Effects (you could also use Tombo Adhesive, or another strong adhesive), and then decorated the can!

Here is a shot of the top of the can. I used my Circle Scissor Plus to cut the circle to fit inside the lid of the can. No peeking at this gift! :)
So . . . . I wrapped her present in a soup can! Yep, a soup can. I have one of those 'safe' can openers that cut along the edge of the can and create a clean edge. So after I washed out the soup can, I inserted her present and then sealed the top with Crystal Effects (you could also use Tombo Adhesive, or another strong adhesive), and then decorated the can!
Here is a shot of the top of the can. I used my Circle Scissor Plus to cut the circle to fit inside the lid of the can. No peeking at this gift! :)
Ink: Chocolate Chip
Paper: Old olive, Real Red, Baja Breeze, Ski Slope DSP (retired)
Accessories: Chocolate Chip Ribbon, Circle Scissor Plus, Crystal Effects
Wednesday, November 11, 2009
November Club
It's club time again! We have a great Thanksgiving card, and 2 cards that go with home-made gifts. Nothing better than a home-made gift these days!
Okay, so this first card really makes me smile. I just LOVE the 3-d pumpkin. I am not sure that it will mail well, but pop an extra stamp on it, and I bet it would! The bottom edges of each layer is torn (great therapy to tear paper) and sponged.

Here is a close up of the 3-d pumpkin. It is made up of 8 scallop oval punches that are sponged on the edges. And a litle piece of scrap Old Olive curled up for the stem. :)

Anyone make home-made salsa, jelly, bread, cookies, pasta? Anything that you make and give as a gift would look great topped with this cute little apron, don't you think? Write the recipe on the card and makes a great gift topper. Make sure you fill in the yum factor! :)
And this last one is great packaging for those of you who gift photo cd's or dvd's for Christmas. This is a great CD case that I found a tutorial for here. Very easy tutorial to follow!
Okay, so this first card really makes me smile. I just LOVE the 3-d pumpkin. I am not sure that it will mail well, but pop an extra stamp on it, and I bet it would! The bottom edges of each layer is torn (great therapy to tear paper) and sponged.
Here is a close up of the 3-d pumpkin. It is made up of 8 scallop oval punches that are sponged on the edges. And a litle piece of scrap Old Olive curled up for the stem. :)
Recipe:
Stamp Set: Falling Leaves
Ink: Soft Suede
Paper: More Mustard, Soft Suede, Very Vanilla, Pumpkin Pie, Old Olive
Accessories: Soft Suede Ribbon, Scallop Oval Punch
Technique: Sponging, Tearing
Anyone make home-made salsa, jelly, bread, cookies, pasta? Anything that you make and give as a gift would look great topped with this cute little apron, don't you think? Write the recipe on the card and makes a great gift topper. Make sure you fill in the yum factor! :)
Stamp Set: From the Kitchen of
Ink: Choclate Chip
Paper: choclate chip, Real Red, Old Olive, Very Vanilla
Accessories: Old Olive Ribbon, Sleigh Bells Ribbon, Round Tab Punch, Scallop Circle Punch, 1 1/4" Circle Punch, 1 3/8" Circle Punch, Dimensionals, Jumbo Eyelets
And this last one is great packaging for those of you who gift photo cd's or dvd's for Christmas. This is a great CD case that I found a tutorial for here. Very easy tutorial to follow!
This is a shot of the back of the CD case.
Recipe:
Stamp Set: Sweet Celebrations (retired)
Ink: Rich Razzleberry
Paper: Kraft, Old Olive, Whisper White, Rich Razzleberry, Cottage Wall DSP
Accessories: Velcro circle, Rich Razzleberry Ribbon, 1 3/8" Circle Punch, 1 1/4" Circle Punch, Dimensionals, Big Shot, Build a Daisy Die, 5/8" Jumbo Brad
See ya gals tonight! Anyone want to join club? Contact me!
Labels:
Big Shot,
Christmas,
Club,
gift,
Thanksgiving
Sunday, November 8, 2009
Crystal Lite anyone?
This would be a 're-claimed' Crystal Lite container that I have altered into gift packaging! Take advantage of items in your house that you would normally throw away and turn them into hand-crafted items!
This was easy to do - just wrap some DSP around your container, and then do some festive ribbon.
The best part, I think, of the whole package is the bow on top!! I am in love with it! You can find the tutorial here. Its WAY easy to make! This packaging AND bow used 1 sheet of designer paper. Looks quite fetching, don't you think? It already has a gift in it. Can you believe I already have a Christmas present ready and wrapped? me neither . . .
This was easy to do - just wrap some DSP around your container, and then do some festive ribbon.
Recipe:
Paper: Ski Slope DSP (retired), Real Read
Accessories: Alpine Ribbon, Brad, Dimensional, Glue Dot
Monday, November 2, 2009
Candy Stocking Stuffer
Halloween is over, which means it is time to start thinking about Christmas! I don't know about your family, but my family gets really excited about stocking stuffers. Overboard, is actually a better word! This year there are going to be lots of handmade stuffers! These may find their way into a few stockings . . .

The ribbon is tied around the candy bar and works as a slide to get the candy out of the belly band wrapper. These candies were on sale 2/$1 last week at Walgreens. I sure do LOVE a sale!
Recipe:
Stamp Set: Christmas Punch
Ink: Wild Wasabi (retired)
Paper: Real Red, Wild Wasabi (retired), retired DSP
Accessories: Bashful Blue Ribbon, Dimensionals
Wednesday, June 17, 2009
Birthday Gift Bag
I think this would totally make a great birthday gift. Or any other kind of gift, for that matter! Who doesn't love to receive a hand-made gift? This gift bag I found at Michaels, but I'm sure you could find them anywhere. Cover it with designer paper, and then fill the inside with cards! I literally finished it in under a half an hour last night after I got back from cleaning the new house. Wouldn't be a bad idea to have a few of these on hand....
And here are the cards that go inside:
Recipe:
Stamp Set: Curly Label
Ink: Chocolate Chip, Basic Black
Paper: Pacific Point, Summer Sun, Chocolate chip, Whisper White, Good Morning Sunshine DSP
Accessories: Curly Label Punch, Dimensionals, Kiwi Kiss Ribbon,
Chocolate Chip Ribbon, Cordorouy Buttons
Monday, June 15, 2009
Handy notes
So the current In-Colors are retiring, and I will miss them! They are so bright and vibrant. These little note cards showcase all of the in-colors in addition to a stamp set that is retiring that I love (Sweet Celebrations).
Here is a close up of one of the cards. Perfect for a little note for someone, a thank-you, or whatever you choose.
Here I put all 6 of the note cards into the Medium Cello Bag and tied with ribbon. Wouldn't this make a great little gift for someone? Or perhaps a door prize down the road.........Love it!
Card Recipe:
Stamp Set: Sweet Celebrations
Ink: Riding Hood Red, Tangerine Tango, Pink Pirouette,
Kiwi Kiss, Pacific Point, Baja Breeze
Paper: Whisper White, Riding Hood Red, Tangerine Tango,
Pink Pirouette, Kiwi Kiss, Pacific Point, Baja Breeze
Accessories: Dimensionals, Ribbon: Riding Hood Red,
Tangerine Tango, Pink Pirouette, Kiwi Kiss, Pacific Point,
Baja Breeze, Medium Cello Bags, 1 1/4" Circle Punch, Scallop Circle Punch
Technique: Paper Piercing
Subscribe to:
Posts (Atom)