Friday, May 29, 2009

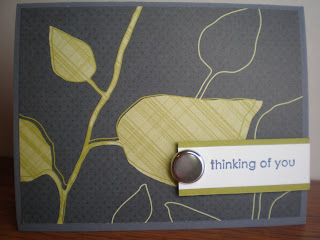
Urban Oasis

Now, when I first saw this paper, I fell in love! I love the colors, I love the lines, and love how elegant it is. Most of the designs are on a very large scale, and when you cut them up, you lose the overall effect of the paper. This is a perfect way to show off those large-scale prints!

Very generic greeting, which is nice for those times that you don't really have a reason to send a card and want to - or - a great card to have 'on hand' for those times you need a card in a hurry! The extra large brad is also super fun!

Recipe:
Stamp Set:
Trendy Trees
Ink: Going Gray
Paper: Going Gray, Whisper White, Kiwi Kiss, Urban Oasis DSP
Accessories: Dimensionals, Neutrals 5/8" jumbo brad

Wednesday, May 27, 2009

Let your DSP do the talking

Okay, over the next few days, I am going to show you some cards that are really fast to put together, BUT because the designer paper is so beautiful and 'loud', I think it works. Do you find yourself spending so much time trying to come up with a bunch of layers to showcase your designer paper and then end up covering it up with those layers? The patterned paper is fantastic, and I find myself buying way more than I ever could need.....

This card uses the Walk in the Park Designer paper, which is in the current Occasions Mini Catalog that only goes through the end of June! Let me know if you want to order anything! Same goes for this stamp set!

The sentiment is actually 2 stamps, so you could put whatever you wanted inside that cute little curly shape! Sorry ladies, no punch for this one! Hand-cutting (my fav!!)

Recipe:
Stamp Set:
Great Friend
Ink: Basic Gray, Baja Breeze
Paper: Cameo Coral, Walk in the Park DSP
Accessories: Baja Breeze Ribbon, Dimensionals

Monday, May 25, 2009

LOVE the Top Note!

Oh my! I may be completely addicted to making these cute little bags. I had seen them awhile back, and hadn't gotten around to buying the paper sacks until yesterday. I just LOVE how they turned out, and you could totally use them for any occasion. As a little thank you gift, favors for a party, place markers at a table, the ideas are endless! Be looking for me to make more of these down the road. A fantastic way to show off the designer paper too!!!

The sentiment on this one "too cute" is perfect for this little tote! And the polka-dots make me smile!

Recipe:
Stamp Set: Sweet Celebrations
Ink: Baja Breeze
Paper: Urban Oasis DSP, Kiwi Kiss, Going Gray, Whisper White
Accessories: Big Shot Top Note Die, Word Window Punch, Scallop Circle Punch, 1 3/8" Circle Punch, 1 1/4" Circle Punch, Dimensionals, Baja Breeze Ribbon

This second one I used my new Cute and Curly Bundle, which is AWESOME! You get 4 stamps that go along with this adorable punch! To get the Chocolate layer, I just adhered the punched out sentiment to the Chocolate and cut around it!

Here is a side view of the bag - you can see the paper bag inside that I am using as my base. I got them at Michael (in the wrapping paper section). They are 3 1/2" x 2" x 6 3/4" and I cut off the top of the bag, measuring from the bottom at 2 3/4".


Recipe:
Stamp Set: Cute and Curly
Ink: Chocolate Chip
Paper: Sweet Always DSP, Chocolate Chip, Whisper White
Accessories: Big Shot Top Note Die, Word Window Punch, Chocolate Chip Ribbon, Dimensionals, Curly Punch

I hope you like these! I hope to spend a bunch of time creating today and this week - I have been a slacker lately! Too much going on! Hope everyone has a great Memorial Day - thanks for stopping by!

Friday, May 22, 2009

Happy Bird-day

Now, I have to say off the bat that this isn't my favorite color combination, but sometimes it is good to break outside of your box. And I am still struggling with water-coloring, but I think I am improving....

This is a card for the son of my dear friend, Kate. Her daughter's card can be seen in this post here. Her son turned 2 this week! Yikes!

I do love, love, love this stamp set! It can be so versatile, and works so well with children's birthdays. Let me know what you think of the colors.....

Recipe:
Stamp Set:
Pun Fun
Ink: Pacific Point, Kiwi Kiss, Basic Black, Tangerine Tango
Paper: Kiwi Kiss, Whisper White, Good Morning Sunshine DSP, Bashful Blue, Tangerine Tango
Accessories: Clip Assortment, Paper Piercer, Dimensionals, Tangerine Tango Ribbon

Wednesday, May 20, 2009

Happy Birthday to Lisa with a cherry on top!!

Well, this card is a little late! Her birthday was last week, so I hope she forgives me that it is arriving late! :) Lisa is one of my fabulous club gals and we have so much fun every month! I know she loves sweets, and although I am not sure about ice cream.....this card is just too cute.

The designer paper is retired from last catalog, but goes so well with the cherry in this stamp set. You could use the current Rockability paper for the same effect. Can you believe I sealed the envelope and THEN realized that I forgot to put the glitter on the cherry! The horrors! I had to rip open that envelope and fix my mistake. How could I forget the bling? (that is why your envelope looks chewed on, Lis!)


Here is a close up of the ice cream sundae with the cherry! Sure makes me want to have ice cream!!! Thank goodness the weather is finally cooperating for such a rendevous! I colored and shaded with Bashful Blue.

The greeting that goes with this particular stamp is too darn cute to leave out, but I ran out of room on the front of my card. So - message goes inside! Always a great option when the outside of your card is full of other fabulous things!

Hope you liked my card. Hope you had a great birthday, Lisa!

Recipe:
Stamp Set: Goodie Goodie Gumdrops
Ink: Basic Black, Real Red, Bashful Blue
Paper: Whisper White, Basic Black, Tart and Tangy DSP (retired)
Accessories: Paper piercer, Black eyelets (non-SU!), Real Red Ribbon, dimensionals

Tuesday, May 19, 2009

Zoofari new baby

I just got this set yesterday, and couldn't wait to get it inked! I think the animals from this Zoofari set are too dang cute! I have a friend in town tonight who just had a baby and am meeting her to meet the new little one!

Love all the pink - of course! I colored the rhino with my markers on to the Confetti White paper - I hate coloring on whisper white. The only thing I don't like about the confetti paper is it looks like i got out of the lines in some places....oh well.

Crinkling the paper for the Saffron layer seems so destructive with the awesome cardstock, but it turned out cute! If you look close, I embossed the Regal Rose layer with my Big Shot

Contgrats to Kate and Scott on their new addition!

Recipe:
Stamp Set:
Family Phrases, Zoofari
Ink: Black Stayz-on, Regal Rose, Going Gray
Paper: Pink Pirouette, Regal Rose, So Saffron, Whisper White
Accessories: So Saffron Ribbon, Big Shot, Silver Brads

Wednesday, May 13, 2009

Stamp Club

Hey ladies! This month totally snuck up on me, I'm not going to lie! Seems to me like I have had a busy month, and have spent more time out of town than ever! Leaves very little time for stamping when house-work and other duties call. Enough complaining....onto this month's cards!

This first one is so fabulous, and if you are a lover of ice cream, I know you are going to make this card right away! I only wish it were ice cream weather....it has been so chilly and rainy lately. The ice cream cone is a piece of paper that I ran through my Big Shot with the diamond texturz....makes it look like an ice cream cone, I love it!!! You could use any colors you wanted for the scoops, you will want to leave 9 scallops, and snip the rest off! I added a little bling (of course), and sponged the edges of everything to give it a little dimension. Wouldn't this be a great invitation to a summer party or bbq??

Recipe:
Stamp Set:
NONE
Ink: Creamy Carmel (to sponge)
Paper: Very Vanilla, Creamy Carmel, Pink Pirouette, Barely Banana, Certainly Celery
Accessories: Very Vanilla Ribbon, Dazzling Diamonds Glitter, Scallop Circle Punch, Dimensionals
Technique: Sponging

The next card I just love! I made it almost a month ago, and have been hanging onto it cuz I just knew my stamping gals would love it! I ran my 'flower pot' through my Big Shot using the dots texturz plate to give it a little umph, and scalloped the edge. The flowers were also made using my Big Shot, using an embosslit die, which embosses AND cuts out your image - FUN! I love all the flower possibilities with this card!

This is the inside of the card where your message is - surprise!

Recipe:
Stamp Set: Blooming With Love
Ink: Close to Cocoa
Paper: Close to Cocoa, Pacific Point, Kiwi Kiss, Riding Hood Red, Very Vanilla
Accessories: Big Shot, Texturz Die, Tangerine Tango Ribbon, Cherry Blossom Embosslit Die, 5 Petal Punch, Scallop Edge Punch, Dimensionals

The last project had me stumped, I will admit. The first 2 projects have been done for awhile, I knew I wanted to use them at club. I was really struggling with something else to make for club, when I ran across this, and knew it would be great!

It is 2 Top Notes from the Big Shot adhered together to make a pouch! Mine is holding a tea bag, but could also hold gift cards, money, gum, candy, whatever your heart desires! With graduations around the corner, this would be a great way to present a gift card to someone, don't you think?


I think this Sweet Always DSP is the greatest!!! I just love the colors together. And, you could use cardstock when making this also, but I just love how the double-sided paper shows when you open up the pouch!

Recipe:
Stamp Set:
Sweet Celebrations
Ink: Chocolate Chip
Paper: Sweet Always DSP, Whisper White, Chocolate Chip, Pumpkin Pie, Regal Rose
Accessories: Chocolate Chip Ribbon, Dimensionals, Scallop Circle Punch,
1 3/8" Circle Punch, 1 1/4" Circle Punch
Technique: Paper Piercing


Thanks for stopping by! Can't wait to see you girls at club tonight!

Sunday, May 10, 2009

Happy Mother's Day

Well, I barely got these cards finished and out in time! My time got cut extremely short, and although I rushed through them, I do like the finished product. I simply colored my image with markers. I attemped initially to water color them, but my water-coloring technique leaves a lot to be desired. I did not have the patience to 'learn' to water color in time to get my mom's day cards completed.

This card will go out to all the mom's in our lives! I LOVE this stamp set, and love the images! They totally work for anyone who loves flowers!

Card Recipe:
Stamp Set:
Blooming With Love
Ink: Chocolate Chip, Baja Breeze, More Mustard, Old Olive, Going Gray
Paper: Baja Breeze, Chocolate Chip, Whisper White, Parisian Breeze DSP
Accessories: Chocolate Chip Ribbon, 1/4" Circle Punch, 1 3/8" Circle Punch, Scallop Circle Punch, Dimensionals

Friday, May 8, 2009

Caribbean, here I come

Well, not for awhile, anyway. I meant to post this earlier in the week, but trial was a little more hectic than I thought it would be, and I literally did not have 5 minutes to sit down and do this.

Dad invited all of us to go on a cruise with him this coming winter, and after this week, I could sure use it! Dad loves to cruise, and thinks this is a good time for all of us to go on one. And what better way to accept his invitation than with a card?! He had given me this palm tree stamp (non-SU!) for Christmas, and this is it's maiden voyage! What better way to break in this particular stamp!


The card turned out super cute. If you look closely at the palm tree itself, you will notice some variation in the coloring. This is a technique called "thumping" and is SOOO fun. I first colored my image with marker directly on the rubber with the lighter colored ink in both the Creamy Carmel and Kiwi Kiss. Then I took my marker in the darker colors (Garden Green and Chocolate Chip) and thumped randomly over the image to give it the two-tone look. I just LOVE it!!! Then a little shading on the ground with some gray, and wa-la! Whatcha think? Dad was tickled when he got the card in the mail! Can't wait for February!

Card Recipe
Stamp Set:
Palm Tree (Non-SU!)
Ink: Kiwi Kiss, Garden Green, Creamy Carmel, Chocolate Chip, Going Gray
Paper: Kraft, Kiwi Kiss, Whipser White, Basic Black, Urban Oasis DSP
Accessories: Kraft Taffeta Ribbon, Dimensionals

Tuesday, May 5, 2009

Stampin' Up! Sale

Just a real quick post to tell you about a great promotion Stampin' Up! is having right now!

Click the photo below to find out the specials running through May 31, 2009! I am so excited about the Designer Paper promotion....it may be time to stock up!!

I will try to post some new things tonight. I have been working non-stop on a big trial at work, and am actually heading to Bozeman to help with trial this afternoon. I hope to have some quiet time in my hotel room to do some posts!