Thursday, September 24, 2009

Falling Leaves Thank you

This is such a great stamp set, and so perfect for fall. I also think that these 3 In-colors are perfect for fall. There is nothing that I don't love about fall. The colors, the smells, the changing of the season. Yummy! These are thank you notes to my dear friends and family for birthday gifts.

I love how this card turned out, although it was a little time intensive to make 8 of! First take your piece of Vanilla cardstock and randomly stamp your image, then cut into a grid, sponge and adhere to your next piece of card stock. What a great fall look!

Recipe:
Stamp Set: Falling Leaves, Trendy Trees
Ink: Crushed Curry, Dusty Durango, Soft Suede
Paper: Soft Suede, Dusty Durango, Very Vanilla
Accessories: Oval Punch, Large Oval Punch, Crushed Curry Ribbon, Jumbo Eyelet
Technique: Sponging

Tuesday, September 22, 2009

Christmas pouch

Yep, you read that right. Christmas. In my experience from last year, if you are going to make your Christmas cards and gifts, you must start early! Otherwise, it turns into such a chore that you can't get anything done. So! Here goes the first Christmas card.

This makes a great little pouch for a gift card or photo to go inside. A tutorial for this card can be found here. She does such a great tutorial and this little card turned out so cute! Great way to show off your DSP. Speaking of which - this is some new stuff from the catalog - Merry Moments. LOVE it!

Here is a shot of the inside note area. Great place to write your merry message!


And all the pieces . . .


Recipe:
Stamp Set: Winter Post, The More the Merrier
Ink: Chocolate Chip
Paper: Real Red, Garden Green, Very Vanilla, Merry Moments DSP
Accessories: Old Olive Ribbon, Big Shot, Top Note Die, Silver Brad, 1 1/4" Circle Punch, Round Tab Punch, Crimper

Hope this inspires you to start on Christmas!

Wednesday, September 9, 2009

September Club

I know, I know! Halloween already?! Well, yea! I want to make sure you all have time to make some fabulous things before the next holiday is upon us. Cause you know, once Halloween comes, Christmas is merely around the corner.

This first project is an example of how "found items" at your house can turn into a cute treat, gift or candy holder. You know how much I like candy containers . . . this is a transformed Starbucks Frappacino bottle!

Here is a close up of the top of the jar. Make sure you cover up the label for what used to be in the jar!

Recipe:
Stamp Set: Eat Drink and be Scary
Ink: Basic Black
Paper: Basic Black, Dusty Durango, Garden Green, Whisper White
Accessories: Dusty Durango Ribbon, Linen Thread, Scallop Circle Punch, 1 3/8" Circle Punch, 1 1/4" Circle Punch, Small Tag punch, Large Tag Punch, Dimensionals, Paper Piercer, Crimper

This next one is a fantastic Halloween card with a couple of great elements! The row of pumpkins is flat out adorable, but I wanted to draw attention to the fat one with crazy eyes. So I did - with "spot-lighting". Ink the image first on your card layer (I did in Versamark so I could emboss it with black) and then again on a scrap piece so you can spot-light it!

The booglie eyes are my favorite this time of year and makes the pumpkin even cuter! The Old Olive layer is texturized with the Big Shot - I think it looks like pumpkin vines.

Recipe:
Stamp Set: The More the Merrier
Ink: Versamark, Going Gray, Pumpkin Pie, Old Olive, Summer Sun
Paper: Pumpkin Pie, Basic Black, Old Olive, Whisper White
Accessories: Pumpkin Pie Ribbon, Black Embossing Powder, Dimensionals, Big Shot, Texturz Plate, Sponge, 1 1/4" Circle Punch, 1 3/8" Circle Punch, Booglie Eyes


This last project is so adorable, I can barely stand it! And is so easy! You could make this little treat box and decorate it a million different ways for different occasions. This little mummy makes me smile!

Once you have assembled your box and have cut an additional piece the same size as the front of your box, rip into strips, sponge with Creamy Carmel and assemble your mummy! Add a little candy and you have yourself a treat! :) Aren't the booglie eyes just great!?

Recipe:
Ink: Creamy Carmel
Paper: Very Vanilla, Basic Black
Accessories: Basic Black Ribbon, 1/2" Circle Punch, Booglie Eyes, Sponge

See ya tonight!

Friday, September 4, 2009

Let the Cute Begin!

Oh boy do I love this stamp set, and am so sad that it is retired! It is SOOO fun to emboss with! An employee of Duane's just had a baby this summer, and since I just finished their gift I needed a card to get them their present! It's their 4th boy!!

Pretty simple card with some very untraditional colors for a baby card. Whatcha think? I can use the fun Library clip since I am not sending this one in the mail! Since the base of the card is black, I put a piece of Whisper White inside so I could write my message.


Recipe:
Stamp Set: Big on Spring
Ink: Versamark
Paper: Basic Black, Apricot Appeal DSP, Whisper White, Bermuda Bay
Accessories: Mini Library Clip, Dimensionals, Black Embossing Powder
Technique: Embossing

Wednesday, September 2, 2009

Happy Anniversary!

Happy Anniversary to my friends Bridgett and Joe! I can hardly believe it has been 3 years! This little card turned out pretty cute, and I will admit I had my doubts when I started out. My montra: continue to add elements and techniques until you are happy! :)

The stamp set is Oh. So. Cute. and is a hostess set in the new catalog. I colored the little love birds with my Watercolor Wonder Crayons and then smudged them with my Watercolor Pen. The hearts have Crystal Effects to give them a little shine. And don't you just love the little clip?! The sentiment is from my favorite sentiment set - Teeny Tiny Wishes!

Happy Anniversary Love birds! :)

Recipe:
Stamp Set: The More the Merrier, Teeny Tiny Wishes
Ink: Going Gray, Not Quite Navy, Real Red, More Mustard
Paper: Creamy Caramel, Not Quite Navy, Real Red, Whisper White
Accessories: Dimensionals, Real Red Ribbon, Assorted Clips
Technique: Paper Piercing

Tuesday, September 1, 2009

Thank you!

I had a great surprise one night last week! A super great family in my (new) neighborhood stopped by with a plate of brownies to welcome us! I know this is such an 'old school' thing to do, but so is sending out thank-you cards, and I am a believer in that as well! The family that brought me brownies just happens to be relatives of mine (sort of . . .) and that makes it more special. Here are the brownies. Yes, notice a few were gone by the time I took the picture. They were delish! Thanks to the Recks!

Of course, in return for home-made goodies, I made a hand-made card. The two kids in the family are little girls, and I thought the pink and the lamb were perfect!

Here is an upclose shot of the lamb. He is (of course) fluffed up with Liquid Applique and his heart is covered in Crystal Effects. If you don't have this stamp set yet, you simply must get it! The sayings are so adorable and the little critters are just so cute!

Recipe:
Stamp Set: Pun Fun
Ink: Regal Rose, Going Gray, Blush Blossom
Paper: Regal Rose, Certainly Celery, Whisper White, Sweet Always DSP (retired)
Accessories: Dimensionals, Crystal Effects, Liquid Applique, Certainly Celery Ribbon (retired),
Big Shot Top Note Die
Technique: Sponging, Heat gun (for the Liquid Applique)

Friday, August 28, 2009

Give Thanks

This is a thank you card for a dear, dear friend of mine. She is a master sewer (even without a pattern) and for Christmas she made me some wonderful things. Christmas, you say? Well, she has 2 little ones at home, and sometimes projects take longer than they are supposed to. Hey - that happens at my house, and I don't even have little ones.

Anyway, I wanted to make her a fun thank you card, and I hope this fits the bill. I used retired autumn paper from last year, but used a new stamp set from the new catalog, the More the Merrier, which is super fun!

You may notice that the sentiment seems 'suspended' in the card front, and it is! To get this look is easy. Stamp your image twice, and adhere them together with a piece of string in the middle. You can use dental floss, but I used some crochet string that I have oodles of. The string then gets put in between your layers that will make up your card front. Punch a shape slightly larger than your sentiment image so that it remains suspended. I had to use the 1 3/8" inch circle punch for my sentiment and the only thing I had larger was the scallop punch so it works!

These would be easy to mass produce for fun thank yous . . . Thanks again Lyns for the great gift! I use it almost every day. If I cook, that is . . .


Recipe:
Stamp Set: The More the Merrier
Ink: Chocolate Chip, More Mustard, Really Rust
Paper: Whisper White, Really Rust, More Mustard, Autumn Vine DSP (retired)
Accessories: Chocolate Chip Ribbon, 1 3//8" Circle Punch, Scallop Circle Punch, Crochet Thread

Posted by Picasa

Wednesday, August 26, 2009

Born to Ride

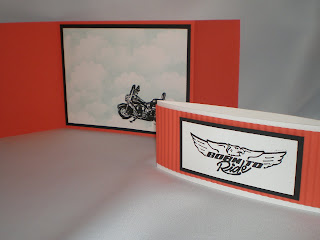
Today is Duane's birthday! Happy birthday babe! He is out of town, so he will get this card when he returns. Many of you may know that we LOVE (and especially Duane) to ride our Harley Davidson motorcycles! For Duane's gift this year, I did something Harley related, so I wanted his birthday card to reflect the same.Now this stamp set is OLD! I had seen someone use it on Splitcoast a long, long time ago, and after lots of looking, found a demonstrator that was selling it and I scooped it right up! So, the stamp set is retired, as is most of the paper that I used for the card, but I do have a fun technique to show you for the inside.The card is a basic gate-fold with a belly band, which I think turned out terrific!!


I think the Tangerine Tango is a perfect Harley color, and the Halloween paper from last year is a perfect match! Here is a shot with the card opened, and the belly-band next to it.


Now here is a close up of the center of the card and the new "technique" I want to show you. Can you see how it looks like there are clouds behind the motorcycle (which is embossed)? Take your scallop circle punch and punch it out of some scrap card stock. Then take a light blue (I used Soft Sky, but you could use Bashful Blue as well) and sponge up and over the top of the scallop circle. Do this all over your card until your space is filled in with the number of clouds you want. Cool, huh?


Recipe:
Stamp Set: Born to Ride (retired)
Ink: Versamark, Soft Sky (retired)
Paper: Tangerine Tango (retired), Basic Black, Whisper White, Ghostly Greetings DSP (retired)Accessories: Crimper, Black Embossing Powder, Scallop Circle Punch
Technique: Crimping, "cloud-making", Embossing

Happy Birthday babe!

Hmmm . . .

I see that there is some kind of error with my pictures for today's post. I will re-post tonight when I get home. Sorry! :(

Born to Ride

Today is Duane's birthday! Happy birthday babe! He is out of town, so he will get this card when he returns. Many of you may know that we LOVE (and especially Duane) to ride our Harley Davidson motorcycles! For Duane's gift this year, I did something Harley related, so I wanted his birthday card to reflect the same.

Now this stamp set is OLD! I had seen someone use it on Splitcoast a long, long time ago, and after lots of looking, found a demonstrator that was selling it and I scooped it right up! So, the stamp set is retired, as is most of the paper that I used for the card, but I do have a fun technique to show you for the inside.

The card is a basic gate-fold with a belly band, which I think turned out terrific!!

I think the Tangerine Tango is a perfect Harley color, and the Halloween paper from last year is a perfect match! Here is a shot with the card opened, and the belly-band next to it.

Now here is a close up of the center of the card and the new "technique" I want to show you. Can you see how it looks like there are clouds behind the motorcycle (which is embossed)? Take your scallop circle punch and punch it out of some scrap card stock. Then take a light blue (I used Soft Sky, but you could use Bashful Blue as well) and sponge up and over the top of the scallop circle. Do this all over your card until your space is filled in with the number of clouds you want. Cool, huh?

Recipe:
Stamp Set: Born to Ride (retired)
Ink: Versamark, Soft Sky (retired)
Paper: Tangerine Tango (retired), Basic Black, Whisper White, Ghostly Greetings DSP (retired)
Accessories: Crimper, Black Embossing Powder, Scallop Circle Punch
Technique: Crimping, "cloud-making", Embossing
Happy Birthday babe!