Saturday, March 7, 2009

Because nice matters

To start with a funny story....Duane asked if he could keep this card by the bed for the nights that I wake up and tell him to stop eating candy in bed - hahaha! Funny how loud a candy wrapper is when you are sleeping...

It is also a sketch challenge on http://www.splitcoaststampers.com/, although I went with circles instead of squares...

Anyway...I just LOVE this color combination, and was something that I never would have picked on my own. Even though this designer paper is in a package with a bunch of pastels, you can totally pair it with a bold bright!! The flower is cut out (yes, not my favorite thing to do) and from Simply Said and the sentiment is a Hostess Level One Sweet Little Sentiments.


Recipe:
Stamp Set:
Sweet Little Sentiments, Simply Said
Ink: Real Red, Chocolate Chip
Cardstock: Real Red, Chocolate Chip
Accessories: Delicate Dots Designer Paper, Kraft Taffeta Ribbon, Dimensionals, Silver Brads, 1 1/4" Circle Punch, 1 3/8" Circle Punch

Thursday, March 5, 2009

Happy Birthday Val and Sue!

Oh boy! Can you believe there is another birthday at the firm? Geesh - it seems like there is one about every other week. I suppose with 20 employees, the math kinda works out that way....

Both cards are twice the size of normal cards (a whole sheet of cardstock folded in half to make the card) since so many of us have to sign them.

The first card is a style I have used before, only this time I did it mono-chromatic, which I think is a very elegant look. Sue just loves purple, so I pulled out all the purple ink I have to bring this card together. I did find out that I don't have any Stampin' Up! ribbon....and that the only purple ribbon they sell is Elegant Eggplant? Guess I better be getting some of that....

Here is a shot with the vellum turned up at the corner. The vellum does a good job of muting the bold colors from underneath! I just love how the Simply Said stamp set looks underneath the vellum!!


Recipe:
Stamp Set: Simply Said, Party Hearty
Ink: Perfect Plum, Elegant Eggplant, Orchid Opulence, Lovely Lilac, Almost Amethyst, Black Stayzon
Cardstock: Almost Amethyst, Vellum, Whisper White
Accessories: Brads, Purple Ribbon (non-SU!)

The second card is for Val (or Shaniqua, depending on who you are). She is bold, loud and I thought the designer paper from the Good Morning Sunshine fit perfectly! I used the Gatefold card, which is really easy to do, and looks super cool!

Recipe:
Stamp Set: Congrats (SAB)
Ink: Chocolate Chip
Cardstock: Kiwi Kiss, Pacific Point, Chocolate Chip, Very Vanilla, Summer Sun
Accessories: Chocolate Chip Ribbon, Brad, Boho Punch, Dimensionals, Good Morning Sunshine Designer Paper
Technique: Sponging

Hope you like the birthday cards!

Pun Fun Birthdays

So my bestest gal pal asked if I would make some kid type birthday cards for her 'stash' and how could I resist. Lyns is a stay at home mom, and doesn't have the time to make her own cards, so I supply them for her as a renewing birthday present - great deal, right?

When she asked for kid birthday cards, I just knew I would use the Pun Fun set. They are so super duper cute, and have such fun sayings that I think kids would get a kick out of!

Recipe:
Stamp Set: Pun Fun
Ink: Basic Black, Certainly Celery, So Saffron, Pumpkin Pie
Cardstock: Certainly Celery, Kraft, Whisper White, Bashful Blue
Accessories: Ticket Corner Punch, Delicate Dots Designer Paper (SAB), So Saffron Ribbon (SAB), Dimensionals

Recipe:
Stamp Set:
Pun Fun
Ink: Basic Black, Regal Rose, Pumpkin Pie
Cardstock: Regal Rose, Pumpkin Pie, Whisper White
Accessories: Pink Pirouette Ribbon, Dimensionals, Ticket Corner Punch, Sweet Always Designer Paper


Recipe:
Stamp Set:
Pun Fun
Ink: Pacific Point, Basic Black, Summer Sun
Cardstock: Pacific Point, Summer Sun, Whisper White
Accessories: Ticket Corner Punch, Dimensionals, Pacific Point Ribbon, Good Morning Sunshine Designer Paper

Hope you like my Pun Fun birthday cards. I can't decide if I like the hippo or the bird better...whatcha think?

Tuesday, March 3, 2009

Peek-a-boo Thank you!

So I had seen a peek-a-boo card, and just knew that I had to make one! They are so cute, and so easy, and you could use any sentiment really! On this one I used the Sale-a-bration Delicate Dots paper and Sale-a-bration Ribbon (sale goes through March if you are eye-balling something you want!).

Quick lesson: Adhere your designer paper to your cardstock, and then punch through both layers with your larger circle punch (here I used 1 3/8" circle). On a contrasting piece of cardstock, punch your larger circle, and then position your scallop circle around the outside to get the 'frame' to go on the outside of your card. Then make your peek-a-boo part, and be VERY careful adhering it to the inside! Cuz once it's stuck.....it doesn't usually come off again!


Here is the peek inside!


Hope you like the peek-a-boo card, I know that I am going to make many more!!

Recipe:
Stamp Set:
Family Phrases
Ink: Basic Black
Cardstock: Bashful Blue, Certainly Celery, So Saffron
Accessories: So Saffron Ribbon (SAB), Delicate Dots Designer Paper (SAB), Paper Piercer, Scallop Circle Punch, 1 3/8" Circle Punch, 1 1/4" Circle Punch

Thursday, February 26, 2009

Happy Birthday Vicki

And yet another birthday at the firm. Vicki is our newest employee, and started just in time to celebrate her birthday! You know how much I love the Simple Birthday Thanks stamp set! Also maybe because I also love love love cupcakes!!

Close up of the sentiment....this is a hostess set that you can earn and has all kinds of cute little sayings...


And a close up of the cupcake. I just love the gold cherry on top. I know that cherrys aren't usually gold, but somehow a red cherry just seemed out of place. Always gotta have a little bling going on!!!


Card Recipe:
Stamp Set:
Simple Birthday Thanks, Sweet Little Sentiments
Ink: Shara Sand, Bashful Blue
Cardstock: Certainly Celery, Sahara Sand, Bashful Blue, So Saffron, Very Vanilla
Accessories: Delicate Dots Designer Paper (SAB), Hemp Twine, Ticket Corner Punch, Dimensionals, So Saffron Ribbon (SAB), Gold Glitter (non SU!), Eyelets (non SU!)

Hope Vicki has a happy birthday! Hope there are cupcakes for treats....

Monthly Swap

I am involved in a monthly demonstrator swap, and here are the swaps I did this month. We are supposed to be meeting tonight in RED LODGE, and with the winter weather advisory, I'm not going. Good thing I sent my swaps ahead of time.

The first swap was to do a card that used our favorite new stamp set. I knew right away that I wanted to use Fifth Avenue Floral stamp set. The first card that did turned out a little too much like the 4th of July...what do you think?


The top layer of the card is a piece of transparency paper. Remember the overhead projector that teachers used when we were kids? Same stuff! Stamp on it with Stayz-on and that ink isn't going anywhere!

Card Recipe:
Stamp Set:
Fifth Avenue Floral
Ink: Real Red, Pacific Point, Basic Gray, Black Stayz-on
Cardstock: Pacific Point, Basic Black, Whisper White
Accessories: Transparency Paper, Real Red Ribbon, Corner Rounder Punch

This is the card I ended up swapping with...colors are a little softer and not so like fireworks! A little like Valentine's, but who doesn't love pink and red together?

Card Recipe:
Stamp Set:
Fifth Avenue Floral
Ink: Basic Black, Pink Pirouette, Riding Hood Red, Black Stayz-on
Cardstock: Riding Hood Red, Basic Black, Very Vanilla
Accessories: Transparency Paper, Riding Hood Red Taffeta Ribbon, Corner Rounder Punch

The second swap was a little more difficult to wrap my head around. We were supposed to do a "punch art" swap, either a card or 3-d. In other words, create an image only using the Stampin' Up! punches...I searched and searched the internet for ideas. I don't think my brain works quite like that, and even the samples that I found were a little too "cartoonish". I love flowers, and this is what I came up with using 3 different layers of the scallop circle punch. I used my scissors and snipped every other scallop almost to the center to make the petal. Do a little sponging around the edges to give it some depth, and layer it up.

Card Recipe:
Stamp Set:
Family Phrases
Ink: Regal Rose
Cardstock: Regal Rose, Whisper White, Certainly Celery, Old Olive, So Saffron
Accessories: Dimensionals
Punches: Scallop Circle Punch, 1/2" Circle Punch, Horizontal Slot Punch, Word Window Punch, 1" Circle Punch, Scallop Edge Punch

Thanks for stopping by! Sorry I have been missing for so long....long week!


Thursday, February 19, 2009

Congrats Lyns and Trevor!

Well, my best girlfriend gave me FANTASTIC news last week! She actually told it to me as a request for a new baby sweater (which I have knitted for each of her other children). She is having a baby! This will be #3, and I am just tickled. Until I have my own children, they are sort of my 'surrogate children', although I don't see them nearly as often as I would like to :(. Her blog can be found here.

This is her Congratulations card. I used the retired set Big on Spring, and I just LOVE LOVE LOVE this set! This is a criss-cross card, and super easy to make!


The onesie is also stamped on a piece of Delicate Dots Designer Paper and is propped up on Dimensionals. Here is what can be found inside the pocket:

Card Recipe:
Stamps: Big on Spring (retired)
Ink: Sahara Sand, So Saffron, Bashful Blue, Certainly Celery
Cardstock: Saraha Sand, Whisper White, So Saffron
Accessories: Dimensionals, Delicate Dots Designer Paper (SAB), Certainly Celery Ribbon (SAB), Heart to Heart Punch

Thanks for stopping by!

Tuesday, February 17, 2009

Party Hearty

Okay, so I got my Liquid Applique in the mail today. I have been wanting this stuff forever so I could use it on some of my fun cupcakes! I had a heck of a time finding it. Apparently no one in town carries it, and doesn't even know what it is!! So, I found it online and thought it was an excuse to buy some more yarn to get free shipping.....I had to break it out tonight and try to see if it is as cool as I thought it would be. Whatcha think?


I also decided to do a Sketch Challenge over at http://www.splitcoaststampers.com/. Makes me think outside my normal box and do different layouts. Try it if you are looking to break out!


I first stamped my cupcake image onto paper, and then covered the 'frosting' part of the cupcake with the liquid applique. To set the applique, give er a blast with the heatgun until it gets frothy. I then added some black Chunky Essentials glitter as the cupcake wrapper. Who doesn't like a little glitter when it comes to cupcakes? :)

Here is a close up shot of the cupcake to see how the liquid applique turned out:

Do you just love it? I think the club girls are going to have to make a card using this next month - it is just too much fun not to!!!

Card Recipe:
Stamp Set: Party Hearty, Family Phrases
Ink: Basic Black, Pacific Point
Cardstock: Real Red, Whisper White, Basic Black
Accessories: Pacific Point Ribbon, Pacific Point Corduroy Buttons, Scallop Circle Punch, Paper Piercer, Dimensionals, Black Chunky Essentials Glitter, Liquid Applique, Designer Label Punch, Good Morning Sunshine Designer Paper
Technique: Paper Piercing, Embossing (heat gun)


Thanks for stopping by!

Monday, February 16, 2009

Congrats to Wendy and Nate

Okay, one more quick one. (I guess I did get another card made this weekend!). When I moved back to Billings after college and started working at the bank, Wendy was one of the first friends I made. She and I have been through a lot in the past 6 years and seen many ups and downs in each other's lives. When I found out this weekend that she was ENGAGED, I was thrilled, to say the least! This is the card I came up with to send immediately in the mail! Soooo happy for her!

I just love this stamp set (even though it is retired), and love to put a little bling on it! (stuck on with the 2-way glue pen)
Card Recipe:
Stamp Set:
Big on Spring (retired)
Ink: Close to Cocoa, Baja Breeze
Cardstock: Close to Cocoa, Baja Breeze, Whisper White
Accessories: Dimensionals, Baja Breeze Ribbon, Baja Breeze Designer Paper, 2-way glue pen, Dazzling Diamonds

Thanks for stopping by!

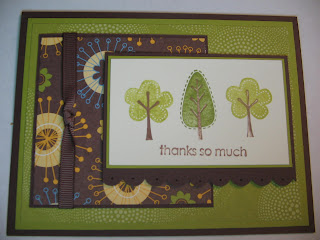
Trendy Trees

Okay, so when the new catalog came out, this was my most favorite stamp set, and was the first to go on my wish list! Can you believe that it took me this long to actually use it?! Eek! And to think I had a 3 day weekend, and the first time I got to sit down and stamp was tonight! Lots of cleaning and preparing for the new house!

Now, this set was not initially easy to work with, even though I wanted it to be. But - It did work out in the end. This is a stamp set that having a Stamp-a-ma-jig is a must. Otherwise, there is no way you will be able to line up the trees and the trunks. So, once you get the hang of it, the trees come pretty easy! The designer paper is the Good Morning Sunshine which I just love! The colors are great!


I love to use the sewing machine on cards - adds a little extra something!!

Card Recipe:
Stamp Set: Trendy Trees
Ink: Summer Sun, Chocolate Chip, Kiwi Kiss
Cardstock: Kiwi Kiss, Summer Sun, Chocolate Chip, Whisper White
Accessories: Dimensionals, Chocolate Chip Ribbon, Corner Rounder Punch, Good Morning Sunshine Designer Paper
Techniques: Sewing machine, Stamp-a-ma-jig

Card Recipe:
Stamp Set: Trendy Trees
Ink: Kiwi Kiss, Old Olive, Chocolate Chip
Cardstock: Chocolate Chip, Kiwi Kiss, Very Vanilla
Accessories: Paper Piercer, Chocolate Chip Ribbon, Scallop Edge Punch, Good Morning Sunshine Designer Paper
Technique: Paper Piercing, Stamp-a-ma-jig

Thanks for coming by!